


Part I : Required Software Installations
AviSynth Installation
First download Avisynth from here -
AviSynth v2.5.8 Alpha 2 [070919] (open source)
Install it.
Microsoft .NET Framework 2.0 Installation
Megui needs Microsoft .NET Framework 2.0. Download the .NET Framework Version 2.0 Redistributable Package from the microsoft website here -
.NET Framework 2.0 SDKs, Redistributables & Service Packs
Install .NET 2.0
NOTE : You can also use Windows Update to install .NET 2.0
MeGui Installation
Download Megui from here
Unzip.
The folder now looks like this -
Double-Click MeGUI.exe to start it.

It will automatically check for updates. Click YES.
It will display a list of files that need to be updated. Click UPDATE to start the update process
It will display a list of files that need to be updated. Click UPDATE to start the update process

Update process at work

During the update process, it will stop to allow you
to select the Profiles (sometimes this window is hidden behind the
Update Window)
Hold Down on the Shift Key and Select all the Profiles, then click IMPORT.
Then Select all the Audio Profiles and click IMPORT.
Finally, select all the Xvid Profiles and click IMPORT.
Hold Down on the Shift Key and Select all the Profiles, then click IMPORT.
Then Select all the Audio Profiles and click IMPORT.
Finally, select all the Xvid Profiles and click IMPORT.

Now Shutdown MeGui for the time being.
Nero AAC Audio Encoder Installation
Then download Nero AAC encoder from here -
Nero Digital - audio and video compression technologies
Unzip.
There are 4 .exe files in the NeroDigitalAudio/win32 folder.
Place them in the Megui main folder.

The Megui main folder will now look like this

MeGUI Setup is now Complete. Lets Start Encoding.
Part II : Actual process of RiPPiNG !
Encoding Kabul Express to 1CD Xvid. Just follow along.
Start Megui
Part II : Actual process of RiPPiNG !
Encoding Kabul Express to 1CD Xvid. Just follow along.
Start Megui

Click Tools | D2V Creator

The DGIndex Project creator will open. Click the Video Input box.

Then choose the first .VOB file of the main movie. For me this file is VTS_02_1.VOB. The whole movie is actually contained in VTS_02_1.VOB, VTS_02_2.VOB, VTS_02_3.VOB and VTS_02_4.VOB. Just select the first and MeGui will add the rest of the files.

NOTE : Do NOT choose VTS_01_0.vob – most of the time it contains only Ads and other junk, choose the first .VOB file that is 0.99GB. The rest of the movie .VOB files of the movie are added automatically.
The following error will pop-up. Click OK.

1. Select “Demux all Audio Tracks”
2. Check the box “and close”
3. Click “Queue”
2. Check the box “and close”
3. Click “Queue”

Click the Queue tab to see the Queue Screen
Click Start.
Click Start.

DGIndex will start in the background and the MeGui Log Window will open.

When the Job has finished, Click the CLEAR button to clear the job queue.

The .d2v file will be created.
The audio files will be demuxed.
The audio files will be demuxed.

Click Tools | Avisynth Script Creator

The AviSynth script creator window will open. Click the Video Input box.

Select the newly created .d2v file. Then click OPEN.

The following screens will open - The main window

and the preview window

On the Main window –
Check the box that says “CROP”
and click “AUTOCROP”
Check the box that says “Suggest Resolution”
Check the box that says “CROP”
and click “AUTOCROP”
Check the box that says “Suggest Resolution”

As you can see in the below image, the AUTOCROP is not perfect – it has left black lines on the top and the bottom.
Move the slider to a light point in the movie to make out the black lines more clearly.

Adjust the crop using the adjustment section on the main AviSynth script creator window as shown below

The adjusted crop eliminates the black borders
completely. This will improve compression and the resulting quality of
the rip will be better.

Then click on the “FILTERS” tab on the top.
Click the “Analyse...” button and let the analysis run.
Click the “Analyse...” button and let the analysis run.

Megui will analyse the video and recommend a
Deinterlace method, if necessary. My movie is shown to be a
“Progressive”, so no De-interlacing needs to be done.
If de-interlacing is needed, then an appropriate de-interlacing method will be suggested.
If de-interlacing is needed, then an appropriate de-interlacing method will be suggested.

Select the Resize filter – Lanczos4 (Sharp) is good
Select the noise filter depending on the movie (if grainy like old movies use a medium or heavy noise filter) – I am using Little Noise
Check the box for “Mpeg2 Deblocking” (optional)
Check the box for “Colour Correction” (optional)
Click the “Preview AVS Script” button to see what your AVS output will look like.

Click the “EDIT” Tab to see what the AVS script looks like.

Then Click “Save” and save the AVS file ... I saved it as KE.avs
The KE.avs file is automatically loaded and a preview window will open. Close the preview window.
1. Choose Video profile = “Xvid > 30% comp check”
2. Then click the “Config” box
The KE.avs file is automatically loaded and a preview window will open. Close the preview window.
1. Choose Video profile = “Xvid > 30% comp check”
2. Then click the “Config” box

Make the Following changes in the Video config
Uncheck “Adaptive Quantization”.
Set Quantization Type to “MPEG” (you can also use H.263 – video will be a little softer)
Click “NEW” to save this profile.
Save the profile for easy use in the future.
Uncheck “Adaptive Quantization”.
Set Quantization Type to “MPEG” (you can also use H.263 – video will be a little softer)
Click “NEW” to save this profile.
Save the profile for easy use in the future.

IMPORTANT NOTES :
This Xvid Profile is good for 1-2CD rips. (Should also be compatible with most standalone Divx DVD players)
I like to use CBR MP3 audio – it does not cause Audio-Video Sync problems most of the time.
With CBR audio, AV sync issues are easy to fix.
I chose 128kbps MP3 audio for this rip since it is a small movie (105 mintes)
For 1CD rip, decrease the bitrate if your movie is longer (110-140minutes, use 96kbps ABR audio)
If the movie is longer than 140 minutes, do a 2CD rip and use 128kbps MP3 audio.
Part III : END NOTES This Xvid Profile is good for 1-2CD rips. (Should also be compatible with most standalone Divx DVD players)
I like to use CBR MP3 audio – it does not cause Audio-Video Sync problems most of the time.
With CBR audio, AV sync issues are easy to fix.
I chose 128kbps MP3 audio for this rip since it is a small movie (105 mintes)
For 1CD rip, decrease the bitrate if your movie is longer (110-140minutes, use 96kbps ABR audio)
If the movie is longer than 140 minutes, do a 2CD rip and use 128kbps MP3 audio.
On the main MeGui screen,
Set the Audio Profile to “MP3-128ABR”
Click the “Config” button

1. Change the Encoding Mode to “CBR”
2. Set the Bitrate to 128 kbps (See Important Notes below)
3. Click “NEW” so save this profile.

Save your Profile so that you can use it for future rips.

Click OK twice to go back to the MeGui main window.
Open the Audio Input file
Open the Audio Input file

Choose the Input Audio File (there may be a few – you remember that we demuxed all the audio tracks). I am using the 3_2channel AC3 (5.1 surround sound) audio file.
Then click OPEN.

Then Click on Tools | Bitrate Calculator

In the Bitrate Calculator, set the following-
1. Codec = Xvid
2. Container = AVI
3. Storage Medium = 1 CD
4. Then Click APPLY. (Do NOT FORGET to hit Apply)
1. Codec = Xvid
2. Container = AVI
3. Storage Medium = 1 CD
4. Then Click APPLY. (Do NOT FORGET to hit Apply)

NOTE : Try and keep the Average Video Bitrate over
500. If the bitrate calculator shows a bitrate less than 500, then go
back to the Audio Config step and reduce the Audio Bitrate.
Then come back to the Bitrate Calculator and check the Average Bitrate again.
If it is still less than 500, please do a 2CD rip (select Storage Medium as 2 CD before hitting APPLY)
Then Enqueue the Video Job and the Audio Job.
Then come back to the Bitrate Calculator and check the Average Bitrate again.
If it is still less than 500, please do a 2CD rip (select Storage Medium as 2 CD before hitting APPLY)
Then Enqueue the Video Job and the Audio Job.

Click on the QUEUE tab, check to make sure both audio and video jobs are present and START the jobs.
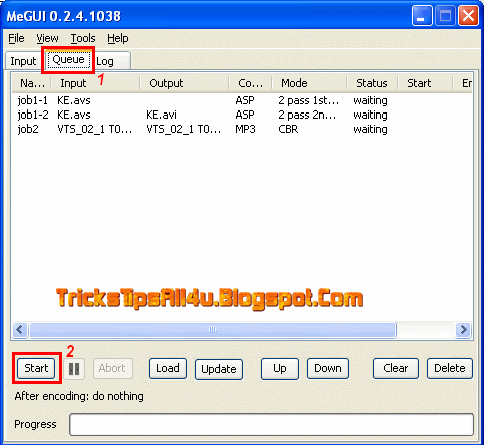
The status window will open to show you the status of the Jobs

A few hours later the jobs will be complete and there
will be a Video AVI file and a Audio MP3 file. Now we need to mux them
together.
I like to use Virtualdubmod for mixing the audio. (But you can use the built in Muxer in MeGui as well)
Get Virtualdubmod here - Free-Codecs.com :: Download VirtualDubMod 1.5.10.2 : VirtualDubMOD is a unification of several popular modifications of VirtualDub
Unzip the file and start Virtualdubmod.exe
Click “Video” and “Click Direct Stream Copy”.

Click “File” and “Open Video File”
Locate the KE.avi Video file created by MeGui and open it.
Click “Streams”, then click “Stream List”
Locate the KE.avi Video file created by MeGui and open it.
Click “Streams”, then click “Stream List”

Click “Add”, then locate the MP3 audio file created using MeGui.
Click “OPEN”.
Click “OPEN”.

Now you are back at the Main Virtualdubmod screen.
Click “File”, then “Save As”
Save the output file (splitting if needed).
Click “File”, then “Save As”
Save the output file (splitting if needed).

Done.


No comments:
Post a Comment