


.jpg)


This guide is for ripping audio cds to mp3s. I see so many users wanting
to share their audio collection in the form of mp3s with the rest of
the users but I don't see even one user ripping them properly. Now the
word properly can be entirely subjective but I have used the word in the
context of general acceptance. The only ones I see who rip music
correctly is digitalone from DDR. And xDR. Now, I donot claim to be the
know-all about how to rip music but IN MY OPINION this guide can output a
mp3 with the best balance between quality and file-size.
This guide doesnot include the procedure for logs, cue sheet generation and playlist file. I personally never use them and I assume a minuscule number of users actually check those files out. This guide is only for MP3 generation. If you are one those whos music ripping is incomplete without the log, cue file and playlist file, quit reading any further and don't waste you time.
Software Download : http://www.exactaudiocopy.de/en/index.php/resources/download
Step 1 : Installation
After downloading, begin the installation process and you will get a screen as show in the screenshot below. Tick as highlighted and continue.

After the installation is complete, insert a RELATIVELY NEW audio cd
into your CD drive but not an entirely new audio cd. The audio cd should
be without scratches. I recommend a popular Hindi audio cd which
released 3-4 months ago. Example : Rockstar. You will then get a screen
as show in the screenshot below. Click on Configure. If you donot get
any screen like the one shown below, try with another audio cd but if
you still can't get that screen, skip this step.

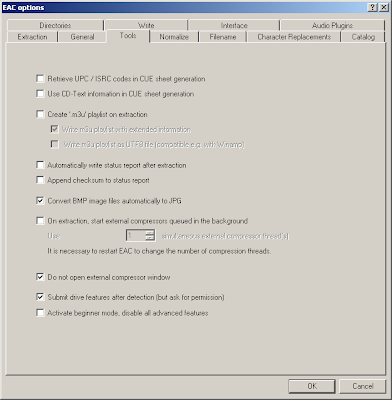
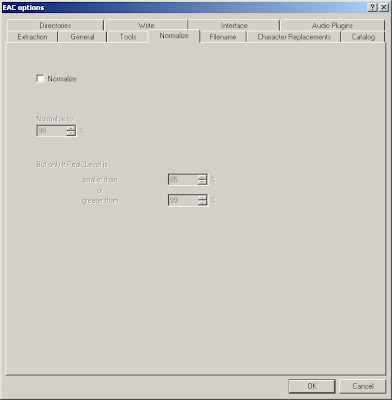
Step 2 : EAC Options
This is how you go to the EAC Options :
This is how you go to the EAC Options :

Configure each TAB as shown in the screenshots below :


In the last screen which shows the Directories tab, just select the
folder in your computer where you want your mp3 to be ripped.
Step 3 : Drive Options
This is how you go to Drive Options :
This is how you go to Drive Options :

You will get a screen as shown below. Click on Ok.

Configure each TAB as shown in the screenshots below :
Click on "Detect Read Features..." in the screen below and click on okay when you get a pop up screen.
Click on "Detect Read Features..." in the screen below and click on okay when you get a pop up screen.

Click on "Autodetect read command now" in the screen below.

If you did the AccurateRip configuration at the start of this guide, the
top half here will be greyed out. If not, you'll need to find your read
offset correction from this list.
Search for the make of your drive and enter the CORRECTION OFFSET value
in the place where you can see +102 greyed out in the screen below.

The below configurations should work in most cases but if your rips
aren't coming out correctly then change the Gap/Index retrieval method
to Detection method B or C.

Step 4: Metadata Options
This is how you go to MetaData Options :
This is how you go to MetaData Options :

Configure each TAB as shown in the screenshots below :


Step 5 : Download LAME
Download LAME 3.98.4 from here : RareWares
Its a 494kB Zip file. Open it in Winzip or any such program if needed. Copy the selected 2 files as show in the screenshot below and paste them in C:\Program Files\Exact Audio Copy folder which is where your installation files of EAC are.
Download LAME 3.98.4 from here : RareWares
Its a 494kB Zip file. Open it in Winzip or any such program if needed. Copy the selected 2 files as show in the screenshot below and paste them in C:\Program Files\Exact Audio Copy folder which is where your installation files of EAC are.

Step 6 : Compression Options
This is how you go to Compression Options :
This is how you go to Compression Options :

Configure each TAB as shown in the screenshots below :
Follow these instructions with regard to the screenshot below. Set up this tab exactly as shown. For Program, including path, used for compression, you'll have to browse to the path where you have lame.exe. The bitrate and high/low quality have no effect on the rip.
Copy-paste this into Additional command-line options : -V 0 --vbr-new --add-id3v2 --ignore-tag-errors --ta "%artist%" --tt "%title%" --tg "%genre%" --tl "%albumtitle%" --ty "%year%" --tn "%tracknr%" --tc "%comment%" %source% %dest%

For FLAC, make the changes as shown in the screenshot below.
Copy-paste this into Additional command-line options : -8 -V -T "ARTIST=%artist%" -T "TITLE=%title%" -T "ALBUM=%albumtitle%" -T "DATE=%year%" -T "TRACKNUMBER=%tracknr%" -T "GENRE=%genre%" -T "PERFORMER=%albuminterpret%" -T "COMPOSER=%composer%" %haslyrics%--tag-from-file=LYRICS="%lyricsfile%"%haslyrics% -T "ALBUMARTIST=%albumartist%" -T "DISCNUMBER=%cdnumber%" -T "TOTALDISCS=%totalcds%" -T "TOTALTRACKS=%numtracks%" -T "COMMENT=%comment%" %source% -o %dest%
Copy-paste this into Additional command-line options : -8 -V -T "ARTIST=%artist%" -T "TITLE=%title%" -T "ALBUM=%albumtitle%" -T "DATE=%year%" -T "TRACKNUMBER=%tracknr%" -T "GENRE=%genre%" -T "PERFORMER=%albuminterpret%" -T "COMPOSER=%composer%" %haslyrics%--tag-from-file=LYRICS="%lyricsfile%"%haslyrics% -T "ALBUMARTIST=%albumartist%" -T "DISCNUMBER=%cdnumber%" -T "TOTALDISCS=%totalcds%" -T "TOTALTRACKS=%numtracks%" -T "COMMENT=%comment%" %source% -o %dest%

Next tab :

Step 7 : Ripping
If the freedb doesn't get the data, you will have to enter all the data.
Title is the name of the song.
In the Artist field I prefer having the Music Director. Users enter the Singers here but I refrain from doing that for a few reasons.
Add the CD Title.
Add the CD Artist where its the Music Director's name again.
Add Year.
Add Genre.

Click on "Detect Gaps" as shown :

Make sure "Append Gaps to Previous Track (default)" is checked.

Click on CMP as shown in the redbox and let the ripping begin.

Step 8 : Tagging
Download this popular software called MP3 Tag : http://download.cnet.com/Mp3tag/3000...-10313616.html
I use this software for 3 things :
1. Entering the Album Art which is the Image for the album.
2. Entering the Composer.
3. Entering the Original Artist.
Firstly, RIGHT-click on the horizontal bar saying "Filename", "Tag", "Title", etc. and configure the columns like this :

Select all the songs and then drag-drop an image into the space shown by
the arrow. Its a good practice to keep the Image file size below
~150kB. As for the Resolution I recommend 500*500. Fill the Composer
field by entering the name of the Music Director and the Lyricist in the
same place by separating them with | . Click on the violet colored
floppy disc shaped icon which is the top-left of the window below
"File". This saves the tags.

Enter all the names of the singers in the Original Artist field.

Thats it. The ripping and tagging is complete


No comments:
Post a Comment