Pages

Ads 468x60px

Showing posts with label Windows Vista Tips. Show all posts

Saturday, 8 September 2012

vista shortcut keys

vista shortcut keys, vista shortcut keys command, vista shortcut
f1 ===== help
f4
===== active list view/display
backspace
===== one level up folder
ctrl + tab
===== forward tabs go/move
ctrl + shift + tab
===== backward tabs go/move
tab
===== forward options go/move
shift + tab
===== back options go/move
alt + underlined letter
===== perform command with underlined letter
enter
===== replace selected commands 
spacebar
===== select/clear check box
arrow keys
===== group's option buttons select

general keyboard shortcuts_2

ctrl + c ===== copy
ctrl + x
===== cut
ctrl + v
===== paste
ctrl + z
===== undo
ctrl + y
===== redo
delete
===== delete/erase (move/go to recycle bin)
shift + delete
===== delete/erase (un returnable/full delete)
f2
===== rename/new name
ctrl + right arrow
===== move/go cursor (starting/beginning next word)
ctrl + left arrow
===== move/go cursor (starting/beginning previous word)
ctrl + down arrow
===== move/go cursor (beginning/opening of the next paragraph)
ctrl + up arrow
===== move/go cursor (starting/beginning previous paragraph)
ctrl + shift + an arrow key
===== block text select
shift + any arrow key
===== more than one object/item select
ctrl + any arrow key + spacebar
===== multi individual object/item(s) select
ctrl + a
===== all items select
f3
===== find/search
alt + enter
===== selected object/item view/display properties
alt + f4
===== close/exit active program
alt + spacebar
===== active window shortcut menu begin/open
ctrl + f4
===== active document stop/close
alt + tab
===== switch/toggle between open program/items
ctrl + alt + tab
===== switch/toggle between open program/items (use arrow keys)
ctrl + mouse scroll wheel
===== desktop icons change/modify size
windows key + tab
===== using windows flip 3d on the taskbar cycling through programs
ctrl + windows key + tab
===== using windows flip 3d on the taskbar cycling through programs
alt + esc
===== cycling through start/opened items
f6
===== cycling through window/desktop screen elements
f4
===== display/view windows explorer address bar list
shift + f10
===== display/view selected item shortcut menu
ctrl + esc
===== start menu begin/open
alt + underlined letter
===== display/view corresponding menu 
alt + underlined letter
===== start/perform menu command 
f10
===== active program menu bar
right arrow
===== right sub-menu's next menu open
left arrow
===== sub-menu/open the next left menu close
f5
===== refresh
esc
===== current task stop/cancel
ctrl + shift + esc
===== task manager start/open
shift + when insert a cd\dvd
===== stop/cancel auto playing (cd/dvd)

general keyboard shortcuts_3

windows key ===== start menu close/open
windows key + pause
===== view/display system properties dialog box
windows key + d
===== view/display desktop
windows key + m
===== all program/windows minimize
windows key + shift + m
===== windows/desktop restore minimized
windows key + e
===== computer start/open
windows key + f
===== file/folder find/search
ctrl + windows key + f
===== computers find/search
windows key + l
===== lock/switch users
windows key + r
===== run dialog box start/open
windows key + t
===== cycling through taskbar item/programs
windows key + tab
===== using windows flip 3d on the taskbar cycling through item/programs
ctrl + windows key + tab
===== using windows flip 3d on taskbar cycling through programs (use arrow keys)
windows key + spacebar
===== all gadgets to the front bring
windows key + g
===== set/cycling through sidebar gadgets
windows key + u
===== start/open ease of access center 
windows key + x
===== windows mobility center start/open
windows key + any number key
===== quick launch shortcut start/open

general key command_4 (windows explorer)

ctrl + n ===== new window start/open
end
===== active window bottom display/view
home
===== active window top view/display
f11
===== active window maximize/minimize
num lock + * (
num pad asterisk) ===== all sub-folders under selected folder display/view
num lock + + (
num pad plus) ===== contents selected folder view/display
num lock + - (
num pad minus) ===== selected folder collapse
left arrow
===== collapse current selection/parent folder
alt + left arrow
===== previous folder view/display
right arrow
===== display/view current selection/first sub-folder
alt + right arrow
===== next folder view/display
ctrl + mouse scroll wheel
===== appearance & size of file/folder icons modify/change
alt + d
===== address bar select

general key command_5 (sidebar)

windows key + spacebar ===== front & select sidebar bring all gadgets
windows key + g
===== cycling through sidebar gadgets
tab
===== cycling through sidebar controls

general key command_6 (photo gallery)

ctrl + f ===== open/start fix pane
ctrl + p
===== print
enter
===== view/display selected picture larger size
ctrl + i
===== open/close details pane
ctrl + . (period)
===== picture clockwise rotate
ctrl + , (comma)
===== picture counter clockwise rotate
f2
===== rename/new name
ctrl + e
===== search/find item
alt + left arrow
===== go back
alt + right arrow
===== go forward
+ (plus)
===== picture thumbnail zoom in/re-size
- (minus)
===== picture thumbnail zoom out/re-size
ctrl + mouse scroll wheel
===== picture thumbnail modify/change size
ctrl + b
===== best/greatest fit
left arrow
===== previous item select
down arrow
===== next item/row select
up arrow
===== previous item easel/previous row thumbnail
page up
===== previous screen
page down
===== next screen
home
===== first item select
end
===== last item select
left arrow
===== collapse node
right arrow
===== expand node

general key command_7 (working with videos)

j ===== 1 frame move back
k
===== pause
l
===== 1 frame move forward
i
===== trim point set start
o
===== trim point set end

m
===== split clip
home
===== all the way back to start trim point stop & rewind
alt + right arrow
===== advance next frame 
alt + left arrow
===== go back previous frame 
ctrl + k
===== stop & rewind playback
ctrl + p
===== from current location play  
home
===== start trim point move
end
===== end trim point move
page up
===== seek/find to nearest split point before the current location
page down
===== seek/find to nearest split point after the current location

general key command_8 (help viewer)

alt + c ===== table contents view/display
alt + n
===== connection settings menu view/display
f10
===== options menu view/display
alt + left arrow
===== move back to previously displayed/viewed topic
alt + right arrow
===== move forward to the next topic
alt + a
===== display/view customer support page
alt + home
===== display/view help and support home page
home
===== move/go to beginning topic
end
===== move to end topic
ctrl + f
===== search/find current topic
ctrl + p
===== print
f3
===== move to find/search box

general key command_9 (access)

right shift (eight seconds) ===== filter keys on/off
left alt + left shift + print screen (prtscrn)
===== high contrast on/off
left alt + left shift + num lock
===== mouse keys on/off
shift five times
===== sticky keys on/off
num lock (five seconds)
===== toggle on/off
windows key + u
===== open/start ease of access center

Friday, 7 September 2012

How to Remove Shortcut Arrows from Vista Desktop Icons


I’ve been using Vista on my laptop for about a month now and I noticed from day one that the shortcut arrows on my desktop icons are HUGE! I really used to hate the shortcut arrows in Windows XP, but at least they were small and inconspicuous. If you’ve been using Vista, however, you’ll have probably noticed that the icons are much larger and so are the arrows!
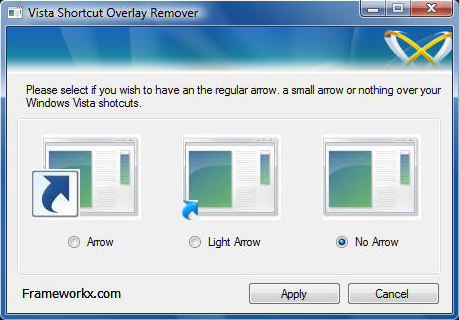
Well, that’s where Vista Shortcut Overlay Remover comes in handy. This little freeware application is by no means a stunning piece of software with loads of features, etc, but then again it’s usually the simple applications that everyone loves.
vista shortcut remover
The program is very simple to use and does it’s one job very well. You can either shrink the arrow size for the arrow shortcuts or remove them altogether from your icons. Choose one of the three options from the list and click Apply.
Now go ahead and log off your computer and log back on. Your arrows should either be gone or be reduced in size. I tried to run this program on Windows XP, but it didn’t allow me to.
If you want to remove the shortcut arrows from Windows XP desktop icons, you’ll need to check out my post on tweaking Windows XP using Tweak UI for XP. You can also tweak many other settings using the Tweak UI program.

Tweak, Disable or Turn Off UAC (User Account Control) in Windows Vista

Looking for a way to disable or turn off UAC in Windows Vista? Don’t you just love how the new UAC (User Account Control) feature works in Windows Vista? It basically prevents you from doing ANYTHING at all on your computer without first popping up an annoying message asking whether you want to perform the action.
The feature was put in to place to prevent unwanted applications, such as viruses and spyware, from self-installing onto the operating system. That’s great, but does one really need to enter a password or click OK every time they want to open a Control Panel applet? That’s a bit annoying, especially if you like to customize and configure your computer the way you want.
user account control
However, disabling UAC altogether is not the best idea in the world. It’s amazing how many times spyware installs itself when you are browsing the Internet or when you insert a floppy disk or USB stick into your computer. So how does one not getting annoyed all the time, but still protect their computers?
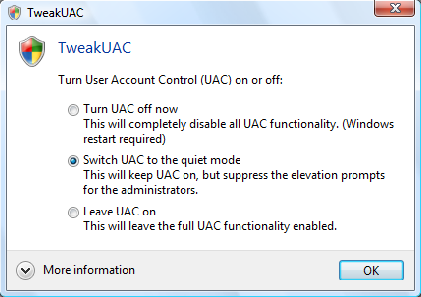
TweakUAC is a freeware application that you can run on Windows Vista to control how User Account Control (UAC) works. You can set it to Turn Off UAC, Turn On UAC, or put UAC into Quiet mode.
tweak UAC
Turning off UAC means that you will not be prompted at any time after restarting your computer. Windows Vista will basically operate at the same level as Windows XP.
Quite mode does not actually turn off UAC, it simply does not display the elevation warnings for Administrators! This is fabulous because you can tweak your computer as an Admin and still have UAC protecting your operating system. For example, if you go to the Control Panel to make changes, you will not be prompted. However, all programs will still run with the default security permissions of a normal user.
Also, any standard users will still receive the prompts. If you switch to quiet mode, Windows may warn you in the taskbar. You can turn that off by double-clicking on the Shield to open Windows Security Center. Click on Change the way Security Center alerts me on the left and choose Don’t notify me.
The program is free and overall helps to fix a really annoying problem in Windows Vista while still protecting your computer. Enjoy!

How to Recover or Restore a Missing Recycle Bin Icon in Windows Vista

Doing some spring cleaning on your computer and accidentally delete the Recycle Bin icon in Windows Vista? If your Recycle Bin icon is missing in Windows Vista, there’s a simple way you can get it back without having to edit the registry, etc as you might have read somewhere else. Unfortunately, it’s not the same method you would recover the Recycle Bin icon in Windows XP, so that’s why I get asked this question so much!
So without further ado, here’s how you would get your Recycle Bin icon back in Windows Vista if you deleted it or removed it by accident.
First, right-click on the Desktop and select Personalize. In the dialog box on the right hand side, there should be an option called Change desktop icons.
change desktop icons
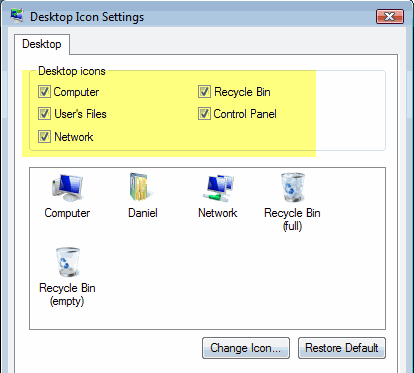
On the Change desktop icons dialog box, go ahead and check the Recycle Bin box to add that back to your desktop. You’ll notice that there is a Full Recycle Bin and Empty Recycle Bin icon.
restore recycle bin
If you click Apply, your icon should now be back on the desktop. However, there may be an issue for some people in which the Recycle Bin continually shows full or empty and does not change depending on if something is added or removed from the trash. It’s almost like Windows Vista gets confused and simply uses one icon instead of switching back and forth.
If you have this problem where the recycle bin icon does not change to reflect “full” and “empty” then you need to first check off Recycle Bin icon like shown above. Then go ahead and left click on the Recycle Bin full icon and click Change Icon. Select the highlighted icon which should be the full Recycle Bin icon. Do the same thing with the empty Recycle Bin icon and go ahead and click Apply.
The Recycle Bin icon should now be on your desktop and should automatically update based on whether there is data in the trash or not. Hopefully this helps out someone who has accidentally removed their Recycle Bin icon from their Vista desktop! Enjoy!

Tweak Windows Vista – Performance, Registry, and Internet Tweaks

There are a bunch of programs that you can use to tweak Windows Vista and I had written about one earlier called MZ Vista Force, which had a good number of Windows Vista tweaks. However, I have just run across another program that not only allows you to tweak Windows Vista, but also has tons of options and features for customization, security, and optimization of your Vista OS.
WinBubble is completely free and has a HUGE number of options for customizing and tweaking Windows Vista, more than I’ve ever seen in any other program! Also, the website has a nice eight part guide on how to use every last feature in the program, so you’re not left alone to figure out what all of those options actually do!
There are so many features in the program that it’s quite hard to list them all out, but I’ll give a quick summary of the most popular ones:
Windows Vista Tweaks & Customizations:
  • Ability to Add/Edit OEM Logo
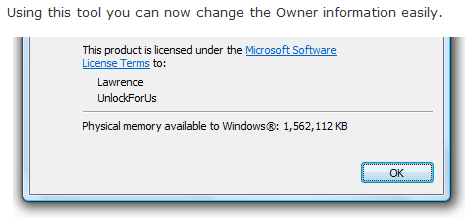
  • Edit Owner Information
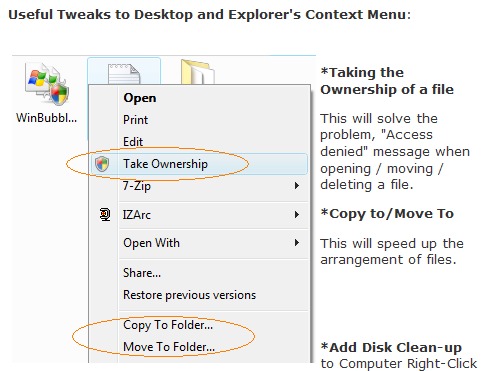
  • Customize the Context Menu: add options like Move To, Copy To, Take Ownership, Pin To, Turn OFF/ON Aero, Disk Clean-up, Open With Notepad
  • Customize Vista Screensaver (Bubbles, Ribbon and Mystify)
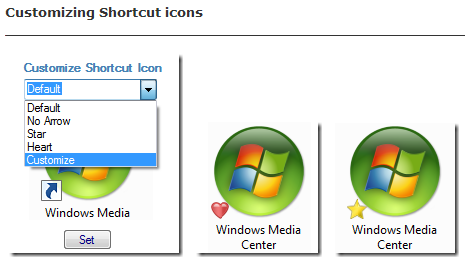
  • Customize or remove the shortcut arrows on desktop icons
  • Customize desktop Icons: show IE, Computer, Network, Control Panel, Username folder and Public Folder on the desktop
  • Hack the Windows Experience Score
  • Re-enable Hibernation in Windows Vista
  • Enable Aurora Bootscreen guide
  • Show Windows Vista Build on the desktop
  • Enable Slow-Down Animations (when minimizing windows)
  • Enable/Disable the Vista Welcome Center
tweak vista
windows vista tweaks
customize windows vista
Windows Vista Security Options:
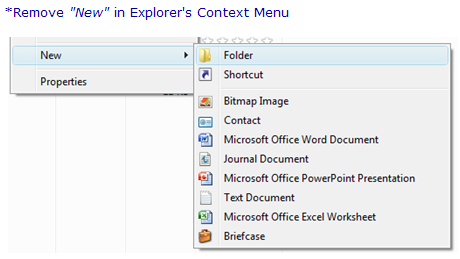
  • Remove the “New” option in Explorers Context Menu
  • Remove the “Folder Options” menu option
  • Disable the Task Manager
  • Disable AutoPlay for any type of media
  • Disable access to Display Property (when right-click on the desktop)
  • Disable access to Control Panel
  • Increase security by forcing to input the Username before logging into Windows
  • Add Encrypt/Decrypt to the Explorer right-click context menu
  • Enable/Disable UAC (User Account Control)
  • Disable the RUN command in the Start Menu and in the Task manager
  • Hide ALL Fixed drives in Vista
  • Hide only a specific drive
  • Hide Shutdown button and other options in the Start Menu
  • Internet Explorer Security settings 1: Disable File->New, File-> Open, Save As, View Source, Favorites, Right-Click, Download, Tools->Internet Options.
  • Internet Explorer Security settings 2: Internet Options Window, Hide General Tab, Security Tab, Privacy Tab, Content Tab, connections Tab, Programs Tab, Advanced Tab
customize vista
Windows Vista Optimizations:
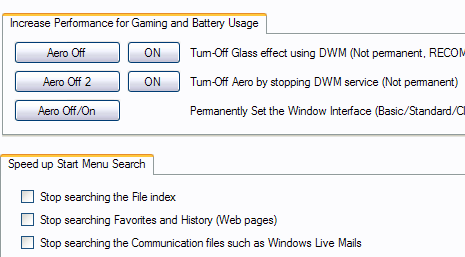
  • Speed-up Start menu search (stops searching the File index, Favorites, History, and Communication files)
  • Clear Multiple Monitor Configuration
  • Three ways to turn off Windows Aero, increases performance for gamers and increase battery life
speed up windows vista
WinBubble has a very clean interface and a large number of features that can be used to customize and tweak Windows Vista to your heart’s desire! Overall a great program for anyone who likes to optimize and personalize their systems. Enjoy!
If you’re looking for a way to tweak Windows XP, you can check out an article I wrote earlier on how to use Tweak UI for XP.

How to Enable Administrator Account in Vista

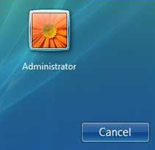
Need to logon as Administrator in Vista? Well first you need to enable the Administrator account! Annoying right? By default, Vista’s secure computing initiative decided that it would be best to disable the Administrator account in Vista so that malicious programs cannot run and take over your computer.
Actually, it’s a good security measure, it’s just annoying if you need to logon to the Administrator account. Luckily, it’s not very hard to enable the admin account in Vista, so here are the steps you need to take in order to get the Administrator account as an option on the Vista logon screen.
administrator vista

Enable Administrator Account in Vista

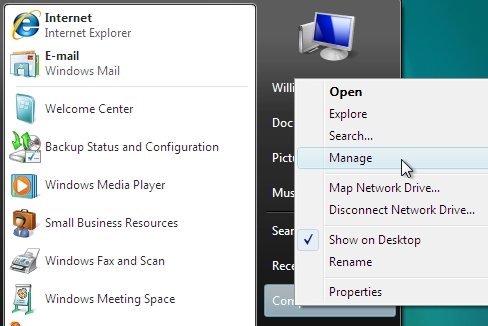
Step 1: First you need to click on the Start Menu and right click on Computer. From the context menu, choose Manage.
manage computer
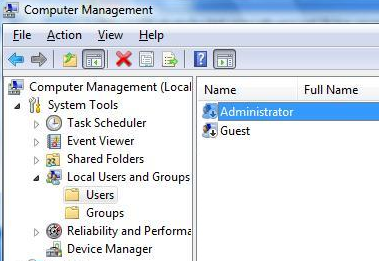
Step 2: In the left hand menu, expand Local User and Groups and then click on Users.
computer management vista
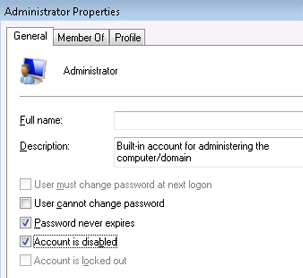
Step 3: Now right-click on the Administrator account and choose Properties. You’ll see a check box called “Account is disabled” that is checked.
administrator
Go ahead and un-check that box to enable the Administrator account in Vista! That’s it! If this didn’t work for some reason, post a comment and I can try to help. Enjoy!

Connect to Wi-Fi Ad-Hoc Networks Automatically with Windows Vista

I recently moved to a new apartment, and lost my small network switch I used for connecting my two laptops and my EEE PC together. All of these devices have a WiFi adapter so I figured I would just set up an Ad-Hoc WiFi network instead of using cables.
This would also mean I could share the Internet connection from my main work laptop and allow me to sit outside in the garden with my sub-notebook and work in the fresh air.
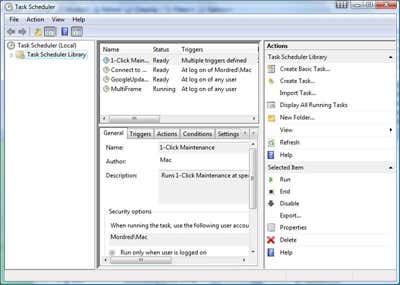
I hit one very annoying fact very early on in this. Namely that Windows Vista does not allow automatic connection to an Ad-Hoc WiFi network, it is seen as a security risk, this meant that every time I started one of the Vista machines I had to manually connect to the network, very annoying at times if I forgot about it. So I decided to solve this problem and I found a way using the Windows Task Scheduler.
Task Scheduler
I first created the Ad-Hoc WiFi network and connected too it, I saved the network setting as a WiFi profile and gave it the name “Decurro”, if you try this yourself you need to remember the name you give the network profile for a later step. I then used the “Create Basic Task” option in Task Scheduler.
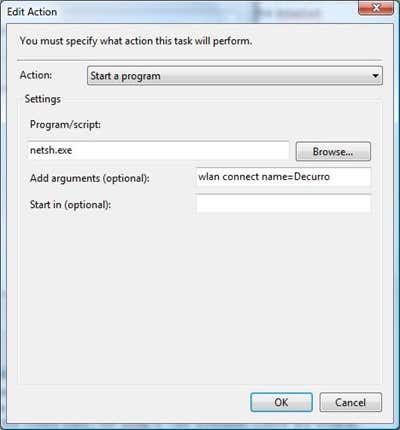
Follow the wizard, give the task a name and then choose the “When I log on” option from the “Task Trigger” window. In the next window select “Start a program” and entered the details in the following screenshot, remember to substitute “Decurro” for your own network name. Then complete the wizard.
Run Program
And that is pretty much it, next time you log in to your PC, your Ad-Hoc connection will be connected. I did have one slight problem with a driver not being loaded quickly enough after a reboot and the connection failing, so I added a delay to the task.
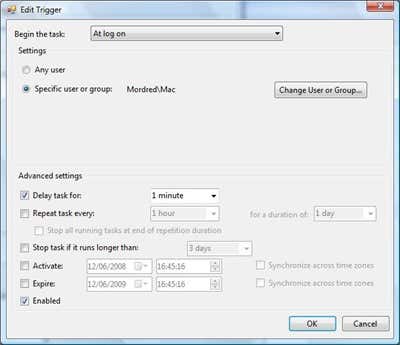
To allow for your system to settle down after a login, before opening the network connection, you will need to go back into the Task Scheduler and edit the task you created, choose the “Triggers” tab and click edit, you will be presented with a window that looks like the one below.
Delay Start
Put a tick in the “Delay task for” box and set the delay to 1 minute, this solved the problem I had with my laptop not being in a state to open the network connection right after login, some people might need to do this, others may not. So there you have it, a quick work around to a ridiculous security limitation of Vista.

How to Change Icon Size in Vista

Do you find the size of desktop icons in Vista too large?  For some strange reason, all of the icons are huge! I like things small, so I quickly found a way to make the icons much smaller.
There are actually two ways you can go about reducing the size of the desktop icons, either via the desktop or by using your mouse, if it has a scroll wheel. I found the second method to be the fastest and easiest.
change vista icon size
change vista desktop icon size
Firstly, go ahead and minimize all programs or windows so that you only see your desktop. Then simply press and hold the CTRL key on your keyboard and scroll the mouse wheel up or down. That’s it! You can make the icons really small or really big:
change vista icon size desktop
If you don’t have a mouse with a scroll wheel on it, you can change the size of the desktop icons in Vista manually by simply right-clicking on the desktop, choosing View and then picking an icon size.
vista icon size
If you choose Classic Icons, that will change the size of all the icons to the default size in Windows XP. That’s my preferred choice.
The scrolling mouse method will allow you to adjust the size of the icons to many more intermediary sizes, rather than just Large, Medium, or Classic. Enjoy!

Clearing the Windows Vista Thumbnails Cache

A very simple tip this one, but I have to admit I was not aware of it myself until today. I found I needed to clear all of the thumbnail images that are shown in the folder views within vista windows. I had installed a new codec pack, and wanted all of the thumbnails in my video library to be consistent in size and quality, so I needed to get rid of the old thumbnails.
Before those of you who already know how to do this start shouting at me saying it’s easy, I would like to defend myself by saying I have never had a need to reset my thumbnails before, and was expecting a much more complicated procedure. Actually, the reason I am posting such a simple tip, is that I am sure there are other folks out there like me, who had no idea where this particular feature of Windows Vista is tucked away hiding.
I scratched my head for a while, I could not remember seeing any system tools to rebuild icons or anything similar in control panel. I absolutely refused to Google up an answer, as I figured I should be able to work this out for myself. I am sorry to say it took me far too long to realise how to do this. In the end it was very simple.
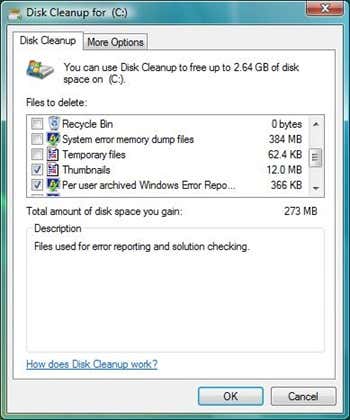
thumbnails
Yes, as you can see, I finally found the option I was looking for when I fired up the disc cleanup utility. Ok, in my defense I would like to point out that both Windows XP and Windows 98 had a separate tool for rebuilding icons, so I was not expecting to just delete the thumbnails, I thought I would have to force some kind of system wide reset.
But there we have it, a very simple way to refresh your thumbnail images, for all types of files and folders, sitting right under your nose! Actually, I had no idea that the disc cleanup utility that is provided as part of the operating system was so well featured, as well as allowing the remove of restore points, usually I used TuneUp Utilities for this little function, now I now how to do it with a native Vista feature.
I think I am going to spend some time exploring every system utility that comes as part of a standard Windows Vista install, and see what other gems I am missing, if I find many interesting things, I will combine them into a post for this site.

How to Enable or Disable System Restore in Vista

System restore is used to restore your system to a previous state.  This is a backup of your core Windows system so if you encounter boot-up or hang-up problems,  you could restore from a saved system profile. 
The system restore feature is ideally enabled before you do something crazy to your computer – like installing new hardware that doesn’t have a signed Windows driver or opening a file from an un-trusted source.   
To enable or disable system restore in Vista follow the steps below.
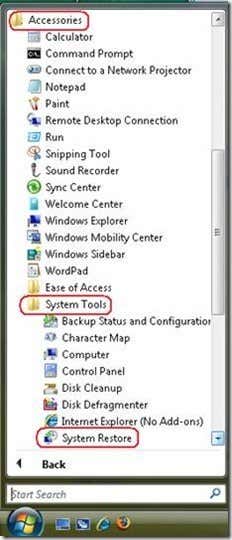
Click on Start > All Programs > Accessories > System Tools >System Restore.  This will open the system restore window.
clip_image004
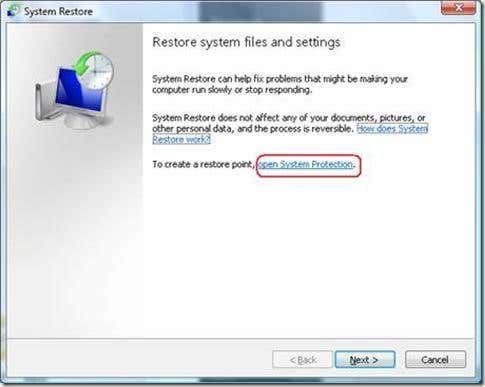
Click open System Protection on the system restore window to open the system properties window.
clip_image006
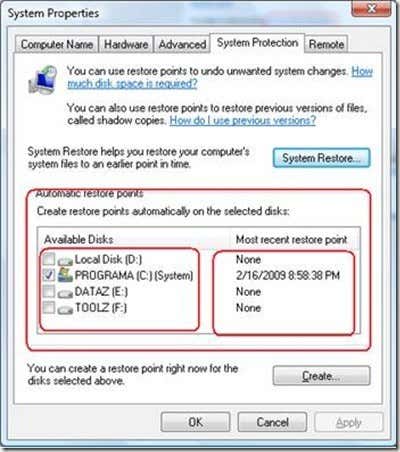
On the System Properties window you will be able to see all the available partitions and the most recent restore points.
clip_image008
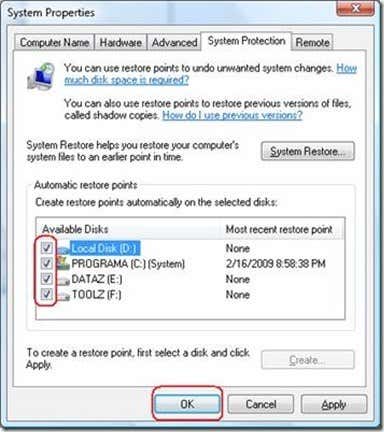
By default system restore on drive C:/ is enabled. To enable system restore to other partitions just click on the check box of the partition where you want to enable system restore and click OK.
clip_image010
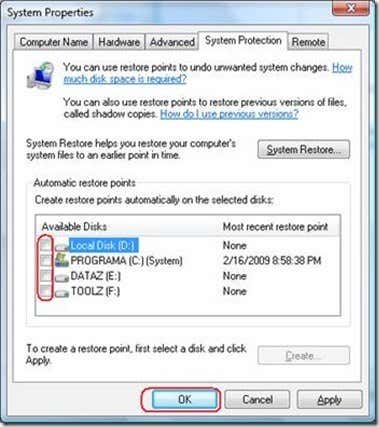
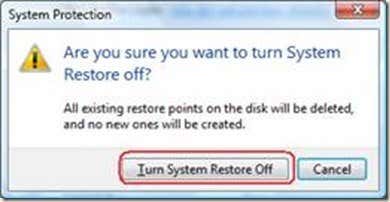
To disable system restore, just uncheck the checkbox on the partition you want to disable it for. Unchecking all boxes will completely disable system restore.  When you uncheck a box for a certain partition a security warning message will pop up, just click Turn System Protection Off to disable system restore.  Note: It is recommended to turn on system restore on your system partition (Drive C:/)
clip_image012
clip_image014
System restore does not backup your documents, it only affects the registry and system files used by Windows.  This means if you have your email or pictures deleted, system restore will not be able to help you with that.  All it does is save restore points of system files, so you can use it to boot or restore from that restore point. 
Ben Carigtan shows you how it’s done.

How to Set Folder Permissions in Vista

Sharing folders has become a common practice in local and corporate networks.  Over the Internet, we can share our latest downloads of pictures of our favorite celebrities, MP3 collections, ripped movies (legal of course) and virtually any other file we want to share.
On a shared PC, folders outside a user’s documents and settings folder are accessible by anyone who can login to that PC.  However there are cases that we would want to restrict access to folders. In this post I will show you how to set security permissions on a folder in Windows Vista.
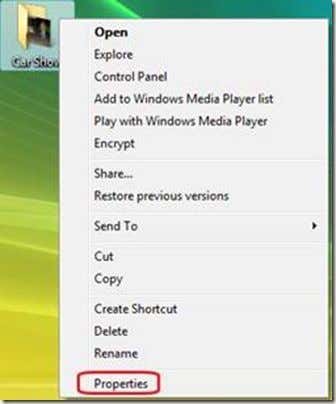
· Right click the folder you want to set the access permissions for and then select Properties.
clip_image002
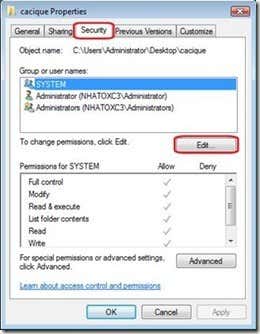
· In the properties window click on the Security tab then click on Edit.
clip_image004
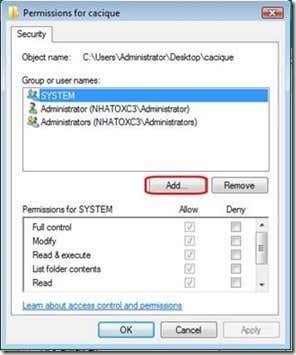
· On the Permissions window click on the Add button to open the Select Users Group or Groups window.
clip_image006
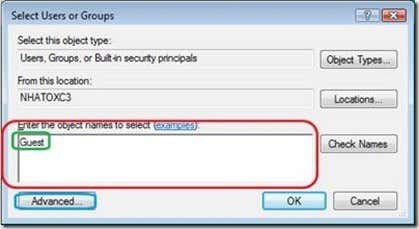
· On the Select Users or Groups window you can enter the usernames of the accounts you want apply the restrictions.
clip_image008
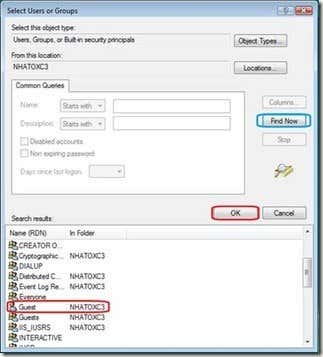
· If you are not sure of the usernames click on the Advanced button to open a search window. In the search window click on the Find Now button to display all the available usernames. Click on the user then click OK.
clip_image010
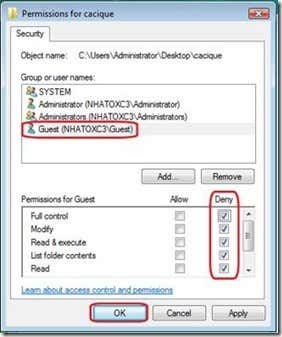
· On the Permissions window you can now set the permissions to deny/allow by checking the checkbox under the deny/allow option.
clip_image012
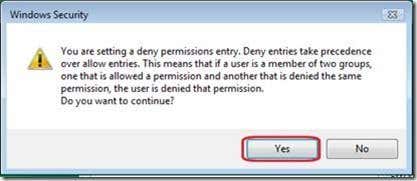
· On the security window that will pop up click OK.
clip_image014
· The access permissions for the folder will now be applied.  As you can see deny entries take precedence over allow entries.  Be sure to remember this rule as it causes confusion for a lot of new users.
In the example above, I set all permissions for the guest user to deny.  This means a guest account will not be able to modify or even read the contents of the folder.  If guest log’s in to the PC or connects to the folder using LAN, the guest account will not be allowed to see the contents of the folder.
This is useful if you have multiple accounts setup on your computer, i.e. for kids or other family members, but want to prevent others for accessing a folder.
Related Posts Plugin for WordPress, Blogger...
trickstipsall4u.blogspot.com Webutation
MyFreeCopyright.com Registered & Protected

M

ad

Contact Me

flagcounter

free counters