Pages

Ads 468x60px

Saturday, 8 September 2012

New Adsense Approval Trick

Hello,
Dear Visitors
I Got Awesome Trick To Get Approved Your Adsense

Go To
mail.google.com
Create Fresh G mail I.D.

Now Go To
Google.com/adsense

Provide Your Personal Information
With Fake
Domain Like
www.syuvboego6g3sabl.com

It Will Disapproved After 2 Hours

Now Resubmit It With Any Docstoc Profile URL
That  Uploads At least 20 Documents

For Your Help

I Provide Some URLs 

http://www.docstoc.com/profile/celestekatz
http://www.docstoc.com/profile/xld14276
http://www.docstoc.com/profile/ali.sidd
http://www.docstoc.com/profile/alma495gaskell

 Now Your Account Will Fully Approved Within  24 Hours

This Is Not Genuine Account :(
Use Adsense Old Version When You Are Resubmitting Account

Don't Forget To Share With Friends
Enjoy

Transfer Bookmarks from Firefox to Chrome

Have you switched to Google Chrome from Firefox? If so, you probably want to transfer all your valuable bookmarks and possibly your well-organized Bookmarks toolbar to Chrome.
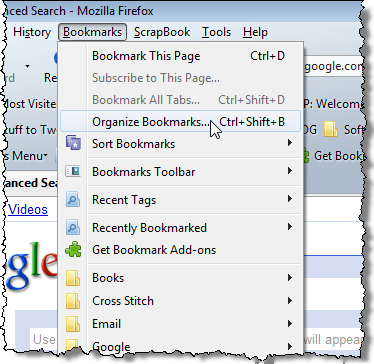
First, you have to export your bookmarks from Firefox to an HTML file. Select Organize Bookmarks from the Bookmarks menu.
Selecting Organize Bookmarks from the Bookmarks menu
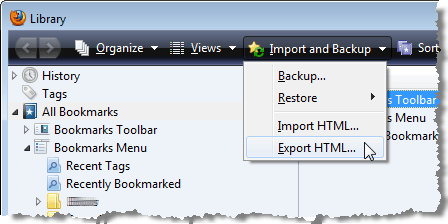
The Library dialog box displays. Select Export HTML from the Import and Backup menu.
Selecting Export HTML option
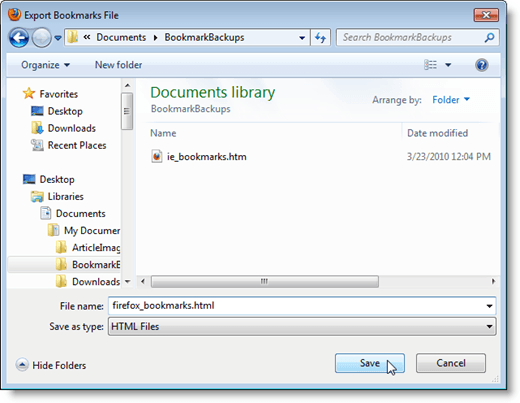
The Export Bookmarks File dialog box displays. Specify a name for the HTML file in the File name edit box and select a location in which to save your file. Click Save.
03_export_bookmarks_file
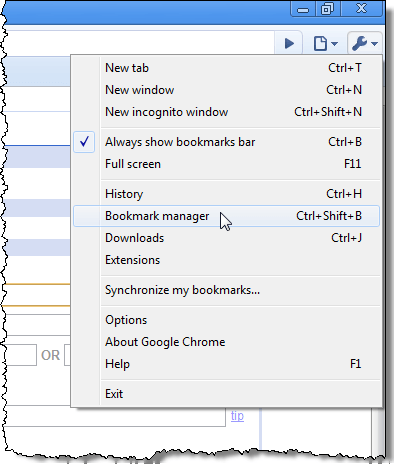
Close Firefox and open Google Chrome. Click the tool button in the upper right corner of the Chrome window and select Bookmark manager from the menu.
Opening the Bookmark Manager in Chrome
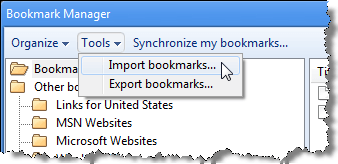
In the Bookmark Manager dialog box, select Import bookmarks from the Tools menu.
Importing bookmarks into Chrome
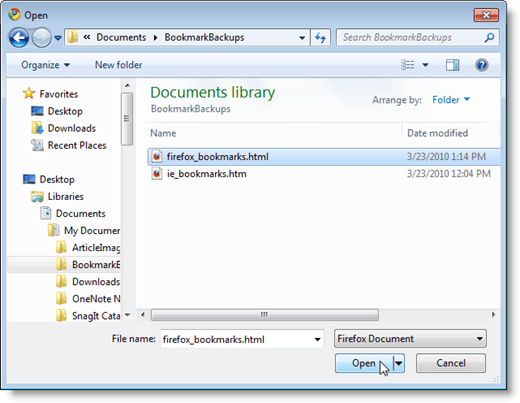
The Open dialog box displays. Navigate to the location in which you saved your Firefox bookmarks file. Select the HTML file and click Open.
Selecting the Firefox bookmarks file
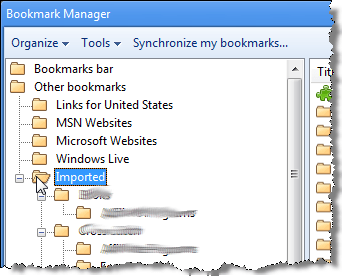
The bookmarks from Firefox are imported into an Imported folder under Other bookmarks.
Imported folder
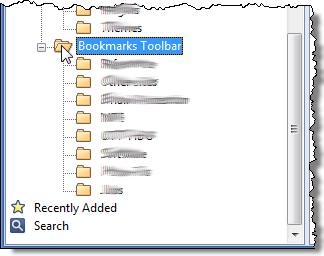
The Bookmarks toolbar from Firefox is also imported under the Imported folder.
Bookmarks Toolbar folder
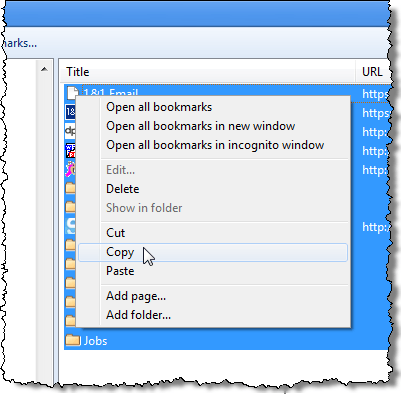
If you want these bookmarks on the Chrome Bookmarks toolbar, highlight the bookmarks in the right pane, right-click on them and select Copy from the pop-up menu.
Copying the Firefox Bookmarks toolbar items
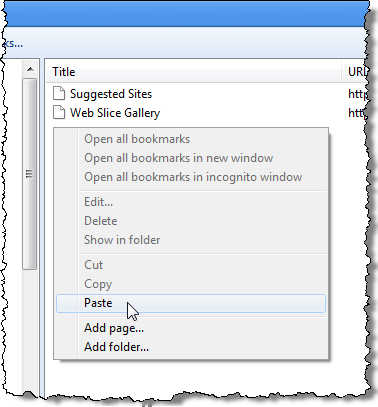
Click the Bookmarks bar folder at the top of the left pane. Right-click in the right pane and select Paste from the pop-up menu.
Pasting the Firefox Bookmarks toolbar items
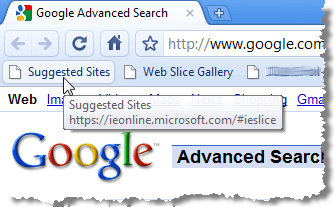
Your bookmarks from the Firefox Bookmarks toolbar are now available on the Chrome Bookmarks bar.
Bookmarks bar in Chrome
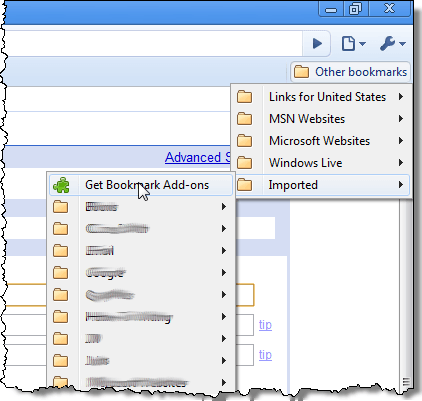
All of the bookmarks you imported, including the Bookmarks toolbar items, are available by clicking the Other bookmarks button in the upper right corner of the Chrome window and then under the Imported folder.
Other bookmarks menu
Now you have access to your Firefox bookmarks in Google Chrome.
We noticed that the items on the Bookmarks bar in Chrome all have both icons and text on them, causing them to take up a lot of room on the toolbar. Firefox has an extension, called Smart Bookmarks Bar, that allows you to hide the text on the items on the Bookmarks toolbar [Condensing the Bookmarks Toolbar in Firefox] thus saving room on the toolbar.
We have not yet found an extension for Chrome that does the same thing. If you know of one, please let us know.

Repair/Fix Corrupt JPG/JPEG Files

Recently, I was working with a client that had accidentally deleted a bunch of photos from his computer. He asked me to recover them for him. I used some file recovery/un-erase software and was able to get all of the pictures back.
However, once the JPEG files were recovered, they were corrupt! For whatever reason, the recovery process had damaged the images (either the file header or the body).
In some cases, the picture would simply not open in any picture viewer program and in other cases the picture would open, but half of the image would be missing! The issue then became how we could repair these corrupt images. Trying to recovery the deleted images again didn’t work, so we were left with photo repair software.
Unfortunately, we found out quickly that in order to repair corrupt JPG images, you have to pay for it! We could not find one good piece of freeware to repair corrupt images. So if the images are really important, it might be worth dropping a little cash to get them back.
There were three different photo recovery options that we tried and I will list them below.

PhotoRescue

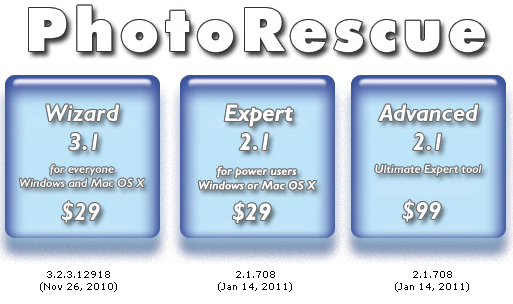
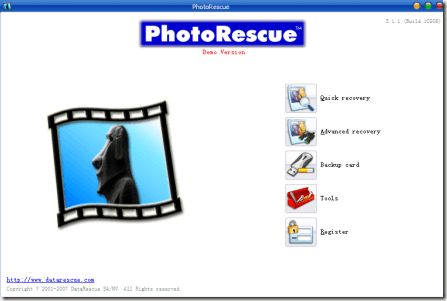
By far the best bang for your buck will be the PhotoRescue program created by DataRescue. It’s the cheapest and it has some of the best results for recovering photos.
fix corrupt jpeg
You can also download the free trial and use the demo to preview the recovered pic. If you like what you see, you can purchase the software and get the full size restored pics.
photorescue
The recovery algorithms can repair many different files types including RAW, CR2, RAF, etc. However, it’s optimized for JPG/JPEG, TIFF, BMP and GIF files. Unless you really know what you are doing, it’s best to not buy the Advanced version of the software.

PixRecovery

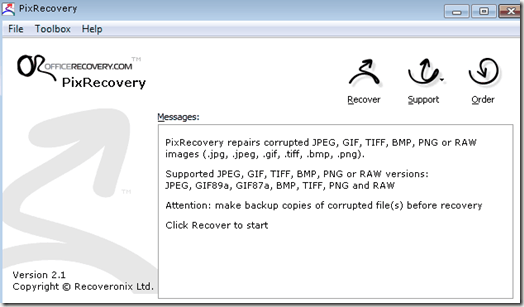
The next best program to fix corrupt JPG images is PixRecovery. You can also download a free demo version of the program to make sure your pictures are actually recoverable before you spend any money.
repair corrupt jpeg
Whereas PhotoRescue is only $29, PixRecovery is $49! That’s about $20 more for getting your pictures back. It may not seem worth it, but if PhotoRescue didn’t work for you and you really want those pictures back, spending $49 more might be worth it.
This program also supports all the major picture formats plus all the major RAW formats.

JPEG Recovery

Another program that also works decently is JPEG Recovery. It comes in two flavors, Basic and Pro. Basic is $40 and Pro is $50. So it’s a little more expensive than PhotoRescue, but cheaper than PixRecovery.
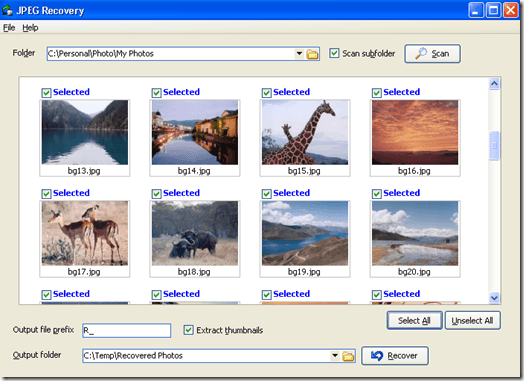
jpeg recovery
This software also lets you demo the app beforehand and make sure it can truly recover your photos. It can fix problems such as photos that have been split into two or more parts, photos that have other photos inserted in-between, photos where the color is messed up, and photos where the contents are shifted.

JPEG Repair

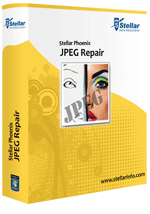
The last possible solution is to use a service called JPEG Repair by a German company. They will have a professional human individually analyze your pictures and repair your image.
However, the manual labor adds quite a bit to the cost. So it’s only really useful if you have just a handful of very important pictures you need to recover. Recovering 10 photos will run you about 50 euros, so it’s quite expensive!
Overall, if you have a lot of corrupt images, download all three programs mentioned and use the demo versions to see which one works best. After that you can make an informed purchase and hopefully get all your photos back! Enjoy!

Make Windows Recognize Mac Formatted External Hard Drives and Files

If you have an external hard drive that is formatted for a Mac computer and are trying to access the files via PC, there is a good chance that Windows will not recognize the external hard drive. However, with the assistance of a unique application, you can make Windows recognize Mac formatted external hard drives and hard drives with Mac files stored on them.
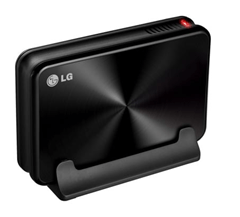
External Hard Drive
There are several different instances in which you may need to make a Mac formatted external hard drive recognizable by a PC. The application MacDrive makes the process simpler than ever.
To get started, head on over to meadifour’s website. Once there, download the free trial of MacDrive.
MacDrive
Upon download, proceed to install MacDrive onto your PC. You may need to reboot your PC after install.
You should  now be ready to access Mac files on PC. Connect your external hard drive to your PC using USB or other connection type. The first time that you plug in the drive, Windows may take a few minutes to search for and find drivers for your particular device (external hard drive).
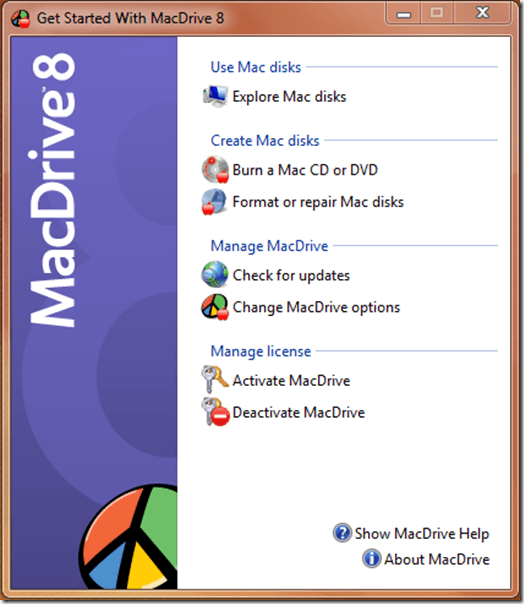
Once connected, MacDrive should auto-launch, but if it does not, click the start menu and navigate to All Programs – MacDrive 8 – Get Started With MacDrive 8.
Mac Drive 8
Select the option Explore Mac disks. A new popup window will open. Select your external hard drive from the devices menu. From here, you can simply browse the external hard drive, and copy any or all files to PC by dragging and dropping.
That’s really all there is to using MacDrive, which is what makes it such a great program. Basically, it makes the Mac format readable by Windows PCs in a way that you can simply browse the external hard drive as if it was any other hard drive.
MacDrive bridges the gap between PC and Windows formatted drives very well. You can even pull an actual hard drive from a Mac computer, and access all of the files via PC. This would be very convenient for anyone who is switching from Mac to PC, and is looking for an easy way to move their Mac documents and files.
Of course, there are some other features as well. You can use MacDrive to format native Mac disks from a PC. MacDrive is free to try, but also very affordable should you decide to purchase the program. Prices start at $49.99 for a one computer license.

Ways to Unlock a Protected Excel File

Most people protect their Excel files before sharing them—especially if the file is a form. While protecting the file keeps other people from altering the spreadsheet’s calculations, if the calculations are wrong, the other person has no way to correct them without the file creator’s password. Plus, such passwords are easily forgotten by the file’s creator.
There are several ways to unlock a protected Excel file without the password. Here are three of the easiest:

1. Upload the File to Google Docs

google docs
Uploading the Excel file to Google Docs will unlock the file. Simply upload the file, then download it from Google Docs. Be sure to save the file with a different name.
However, Google Docs may change some of the cell spacing in the spreadsheet. You may need to realign the many of the cells after the file is unlocked.

2. Upload the File to Zoho Sheet

zoho
Zoho Sheet works similarly to Google Docs, but grants users a few more features, like the ability to edit spreadsheets stored in SharePoint. The process to unlock an Excel file is the same—upload the file, then download it again with a different file name.
For the most part, the file looked the same as it did before we uploaded it. Zoho did, however, change the font.

3. Upload the File to Ensode’s Unlock Utility

ensode 2
While Ensode’s Web site is by far the messiest of these three, the unlock utility provided there works better than both of the previous methods. Scroll past the advertisements to the bottom of the page. Accept the terms and upload your file. A link to your unlocked file is then provided. Simply download it and continue your edits.
ensode 1
Ensode’s unlock utility preserves the integrity of the original spreadsheet. All fonts, cell sizes and calculations remain completely intact. If you can stand the advertisements, this is definitely the best way to go.

Edit Sound in Windows Live Movie Maker

Windows Live Movie Maker makes it easy to edit the sound track in your movie projects. While its tools aren’t very advanced, and you can only have one sound track at a time, Windows Live Movie Maker does allow you some control over the sound in your videos.
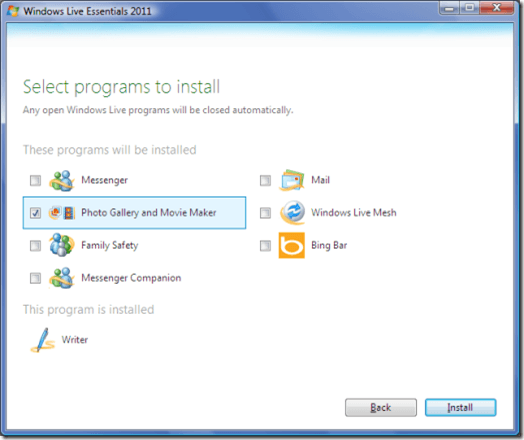
You can use these sound editing tools to add pre-recorded music, sound effects and narration to your videos. If you haven’t already, you can install Windows Live Movie Maker by installing Windows Live Essentials. After you start the installer, just click Choose the programs you want to install. Then click Photo Gallery and Movie Maker and click Install.
Install Windows Live Movie maker
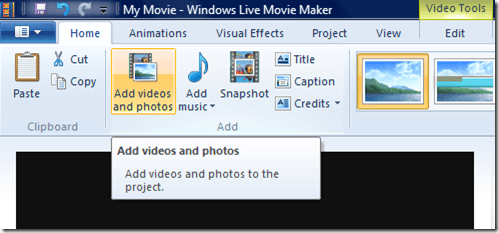
To get started, start Windows Live Movie Maker and select the Home tab. Then click Add videos and photo files to add your video or image files to your movie project. Then click the Add music button. The sound file types you can use with Windows Live Movie Maker include WMA, MP3, WAV, AIF, AIFF, M4A and OGG. When you’ve found and selected the sound file you want to use, click Open.
Add Videos and Photos
The sound file will automatically be added to your movie project. Click the Music Tools tab. Select the sound track in your video project. Select the Music volume button. Move the slider to the left to lower the volume. Move it to the right to raise the volume.
Music Volume
Select the drop-down menu beside Fade in. This option will cause the beginning of your sound track to slowly increase in volume as it starts. Choose Slow, Medium or Fast, depending on how quickly you want the track to fade in. Select Fade out to apply a similar fading effect to the end of your audio track.
Keep in mind that this option fades the sound in or out at the beginning or end of a sound clip, not at the beginning or end of your video. If you have multiple sound clips in your movie project, make sure you select the right ones when adding a fade effect.
Fade Music Track
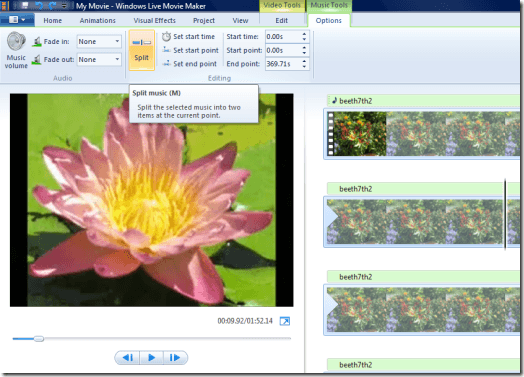
If you want to divide a single sound clip into several sound clips, select the point in your video where you want to cut the sound track. Then click the Split button. This will split only the sound track into multiple clips, leaving your video intact. Once you’ve split your sound clips, you can click and drag them around your video or right click to Cut, Copy and Paste them to another location.
splitsound1
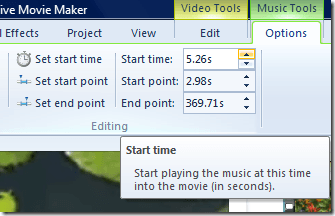
The Start time, Start point and End point will usually be set automatically. However, you can edit these values manually if you need to. Select a value and press the up and down arrow buttons to trim or extend the sound track.
Start and End Points
If there is a conflicting sound track on your video file, click the Video Tools tab. Select the video track, then select Video volume. Slide the slider all the way to the left to completely mute the volume on the video track.
Mute Video Volume

Install, Boot, and Run Mac OS X From an External Hard Drive


Mac OS X can be fully installed onto an external hard drive, using a couple of easy to follow steps. This can be extremely useful for developers, who often times want to test different versions of Mac OS or need multiple testing environments. However, this can also be useful for anyone at all who simply wants to have another copy of Mac OS X to use. 
Before we get started, the objective of this tutorial is to install a full fledged copy of Mac OS X onto an external hard drive; NOT to install Mac OS X onto your computer using an external hard drive, although the process is similar. When finished, you will be able to boot into a full version of Mac OS that is stored and ran off of an external hard drive. You will also be able to boot into the normal OS X on your computer as well.
Mac OS X
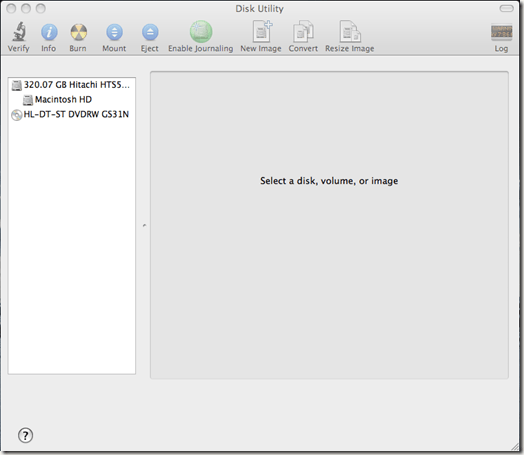
Start off by launching disk utility, using the path Finder > Applications > Utilities > Disk Utility.
Mac Disk Utility
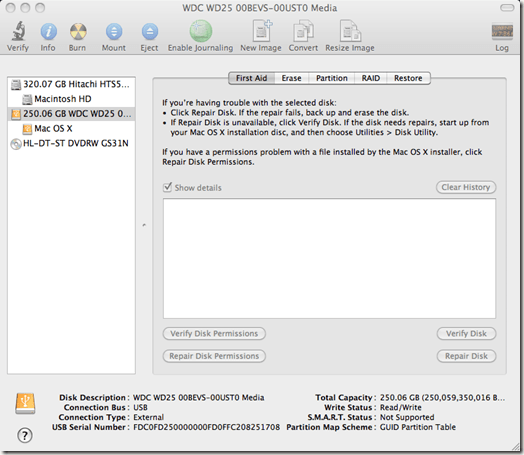
With Disk Utility open and active on your computer, it is now time to connect your external hard drive (which you will be using to store OS X) to your computer. This can be either a USB or Firewire external hard drive.
Once connected, your external hard drive will show up in the left-hand side devices windows of Disk Utility. Click to select your actual hard drive. In our example, we have named the hard drive Mac OS X, but the actual hard drive is 250.06 GB WDC WD25 0…
Hard Drive Selected=
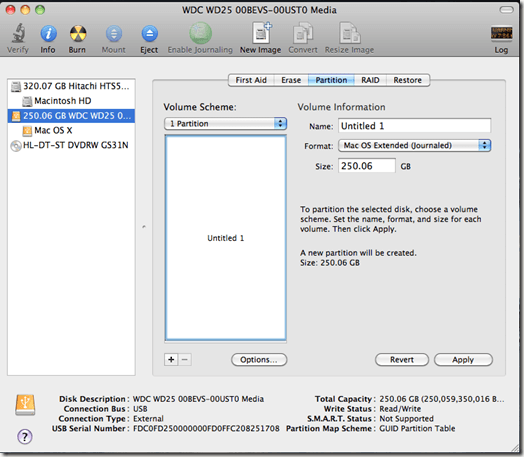
Click the Partition tab to view current schemes for your external hard drive. You can choose to partition the drive anyway that you’d like, but for our tutorial, we will be using a one partition drive, because the drive will be used solely to hold OS X. To select your partition scheme, click the Volume Scheme: drop down menu and select the number of partitions from the list.
After you have done that, click the Options… button, located near the bottom of the Disk Utility window.
1 Partition Mac Disk
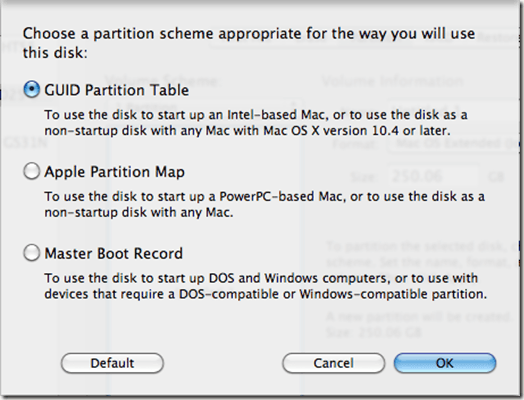
A drop down menu will appear, prompting you to choose a partition scheme. Choose the option GUID Partition Table and click the OK button.
GUID Partition Table
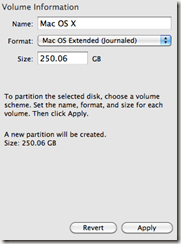
Finally, enter a name for your Partition and make sure that Format is set to OS X (Journaled). You can also enter a custom allocation size for the partition if you would like. For this tutorial, we are using one partition, so we will use the entire drive. Click the Apply button to save changes.
OS X Partition Setup
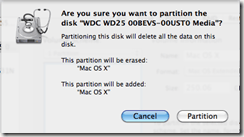
A drop down menu will appear, asking you to confirm that you want to partition the hard drive. Click the Partition button.
Partition Started OS X
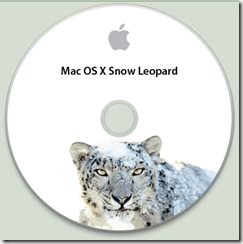
Once the drive finishes partitioning and formatting, you can begin installing Mac OS X. Insert a Mac OS X installation CD/DVD into the SuperDrive on your computer. For this demonstration, we will be using an OEM 10.6 Snow Leopard disc.
10.6 Snow Leopard
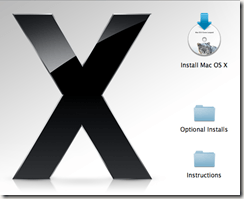
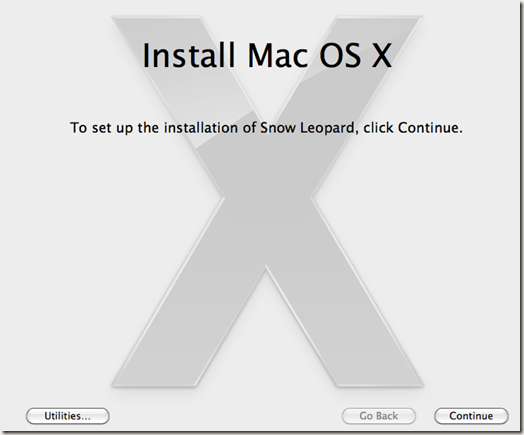
Double click on Mac OS X Install DVD, or your particular CD/DVD icon to enter setup. Once the Mac OS X Install DVD setup window opens, select the option Install Mac OS X.
Install Snow Leopard External
Click Continue to proceed past the first install screen.
Install Screen 1 - OS X
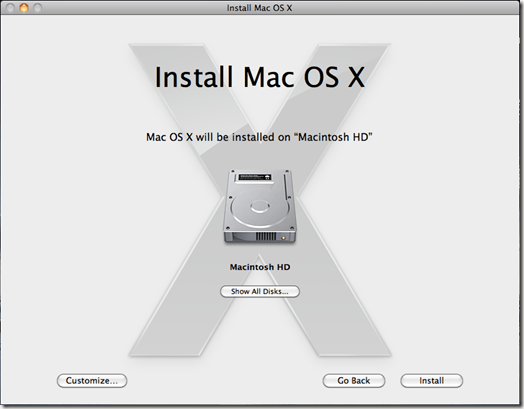
Read over the licensing agreement and click the Agree button. On the next screen, click the Show All Disks… button.
Show all disks - mac os x
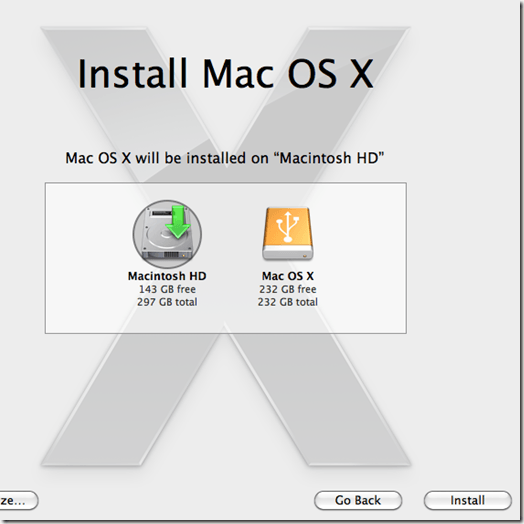
The external hard drive should now be available for selection. Click to select it, and click the Install button.
OS X External HD
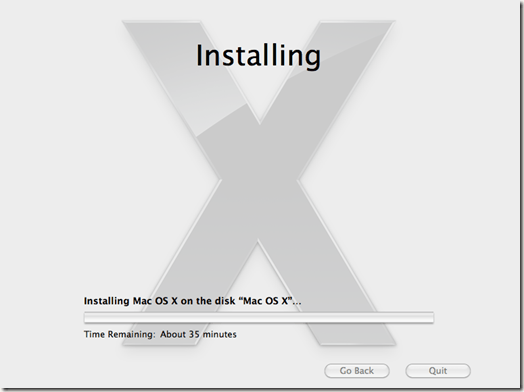
You will be prompted once again, to confirm installation. Click the Install button from the drop down prompt. Mac OS X will begin installing onto the external hard drive.
*Once you click the Install button, you will be prompted to exit all other applications that are running. OS X will also shut down, and switch to the external hard drive in order to install Mac OS X. Bookmark this page now, so that you can jump back to it once OS X finishes installing.*
Snow Leopard Installing
Once Mac OS X finishes installing, you will have successfully completed this tutorial. Next, you may need to know how to choose a startup disk, which will allow you to switch between your primary install of OS X (the one on your computer), and the OS X install on the external hard drive.
You can choose a startup disk when Mac OS X first starts up, or when you first power on your computer. Once you hear the chime sound, before the Apple logo appears, hold down the option button on your keyboard. Hold it for approximately 5 seconds, and then release. Mac OS X will allow you to choose a device to boot from. From here, you can choose your internal or external hard drive.

Volume Too Loud while Playing Videos on PC

I’ve always found it really annoying when watching movies on my PC that some scenes are super loud and some scenes I can barely hear what is going on. I understand they are trying to make it as realistic as possible, but it’s really annoying if you can’t crank up the speakers all the way or if you’re not able to use headphones.
This is especially true at night or in a public place where I’m listening to something on my laptop and suddenly there is really loud dance music or loud action scenes. What do I normally do? Well, I manually turn down the volume until the loud scenes are over and then I turn the volume back up later on.
I’ve been super frustrated with this for a long time until I found a cool program called Sound Lock that works for Windows which will limit the sound output level on your computer! Basically, it’s really a simple piece of software. You just tell it the max sound level you want and it will make sure that the volume never goes above that.
But you’re probably like “Well, can’t I just reduce the volume on my computer to 50% and it would be the same thing?”. Nope! So the program doesn’t just turn down your volume. It plays back quieter scenes at a normal volume and then turns the volume down if something becomes really loud. This is exactly what I wanted because I could listen to the dialogues clearly, but whenever a loud scene started playing, it would keep the volume  at the lower level that I set it too.
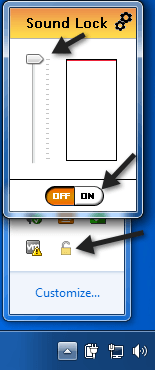
Once you install the software, it’ll pop up in your system tray and if you click on it, you’ll see the following sound adjuster:
sound lock
You need to click the On button and then simply adjust the slider to the desired max sound output level you want. By default, it’s set at the max level. My suggestion would be to play a movie or video, go to a loud scene and then reduce the volume to what sounds best. Then just leave it there and watch the rest of the video.
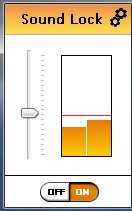
adjust volume
You’ll notice that as long as you don’t drag the slider below the yellow bars, the volume doesn’t actually decrease! That’s what is so cool about this program. The other way you can do it is to play a normal scene with dialogue, for example, and then just drag the slider to a little bit above the bars.
The program works like magic! You can still hear everything in the loud scenes just fine, but instead of it blowing up your ears, you just hear it at the same level as everything else. It does a great job of making the whole audio sound very smooth. There are no big dips or jumps in the sound or anything like that.
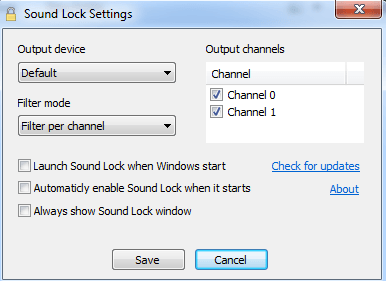
Another cool thing is that you can adjust the volume per channel, up to 14 different channels. If you click on the settings button at the top right, you can see all the channels and pic the sound device.
sound lock settings
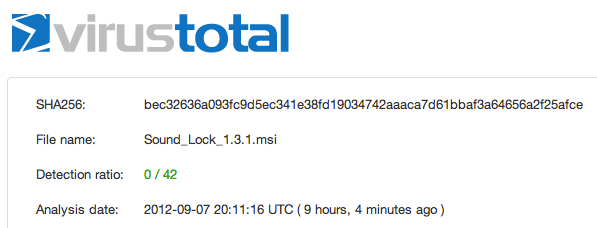
Just as a note, if you download this in IE, you might get a message saying this program is not commonly downloaded, it may harm your computer, etc, etc. I checked the software on VirusTotal and it gave a 100% negative result for viruses, malware or spyware, so you don’t have to worry about that. It’s just not a well-known program and that’s why you get the message in IE.
virus total
I pretty much use this program all the time now even while watching YouTube videos, home videos, songs from my music library or anything else. It just does such a good job with the audio and keeps everything a lot quieter! If you’ve been having the same problem with loud scenes in movies or loud sections in a song or video, this program will work wonders
Related Posts Plugin for WordPress, Blogger...
trickstipsall4u.blogspot.com Webutation
MyFreeCopyright.com Registered & Protected

M

ad

Contact Me

flagcounter

free counters