The Aero Desktop introduced in Windows Vista and now part of Windows 7 made amazing visual enhancements to an otherwise static desktop found in previous versions of the operating system. One useful feature is the ability to cycle through open windows and programs using a three-dimensional interface.
Unfortunately, Microsoft made access to this feature a bit complicated for some people. By holding down the Windows key on the keyboard and continually tapping the Tab key, you can cycle through your open windows in three dimensions.

Given that this feature is difficult to access, most people resort to the taskbar to switch between windows. However, there is a way to create a shortcut to this feature so you are just one click away from using the Aero Desktop 3-D windows switching method. Read on to learn how.

Windows will then ask you for the location of the item. Type the following line into the input box:

Click on the Next button and Windows will ask you to name your shortcut. Type in the name Switch Between Windows and click the Finish button. Truthfully, you could name this shortcut anything you want but it makes sense to use the name above so you can identify it easily later.

You should now have the Switch Between Windows shortcut on your desktop. However, you can give it the appropriate icon so it is easier to identify.
Right click on the Switch Between Windows shortcut and choose Properties.

On the Shortcut tab, click the Change Icon button.

Click the Browse button and locate the file at:

Click the OK button and then click the OK Button on the window underneath. The icon of your Switch Between Windows shortcut should change to the one you chose.
However, storing the Switch Between Windows key on the desktop would mean that you need to minimize all windows currently open to get to it. To make your new shortcut more convenient to use, drag the shortcut to the taskbar to pin it. Now your Switch Between Windows shortcut will always be visible and ready to use.

Using the Windows key plus Tab combination is an awkward method of switching between windows using the Aero desktop. By creating a shortcut and pinning it to the taskbar, you always have the ability to use this feature in a much easier way.
Unfortunately, Microsoft made access to this feature a bit complicated for some people. By holding down the Windows key on the keyboard and continually tapping the Tab key, you can cycle through your open windows in three dimensions.
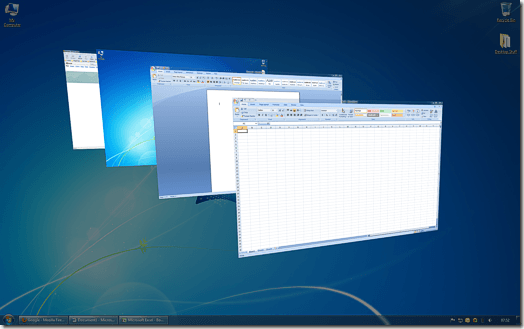
Given that this feature is difficult to access, most people resort to the taskbar to switch between windows. However, there is a way to create a shortcut to this feature so you are just one click away from using the Aero Desktop 3-D windows switching method. Read on to learn how.
Create a Switch Between Windows Icon
To create your Switch Between Windows shortcut, begin by right clicking on the desktop and selecting New and then Shortcut.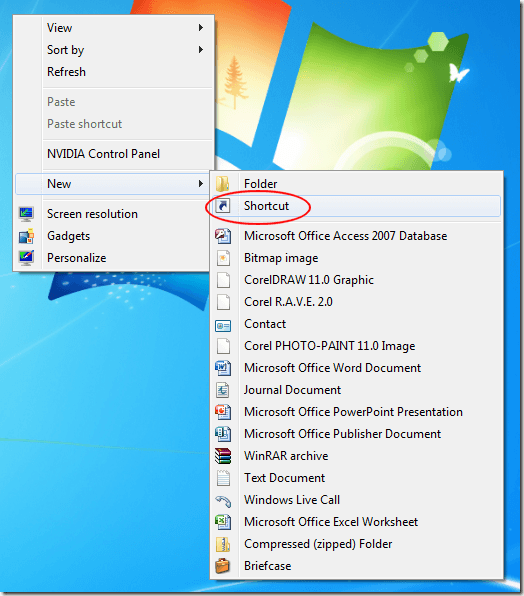
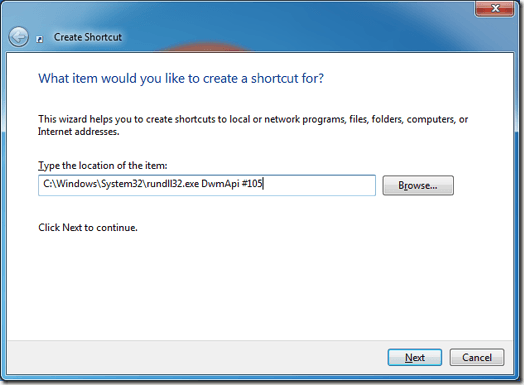
Windows will then ask you for the location of the item. Type the following line into the input box:
C:\Windows\System32\rundll32.exe DwmApi #105Notice that there is a space between exe and DwmApi and another space between DwmApi and #105. Also, if your copy of Windows is on another driver other than C, change C to the drive where Windows is installed.
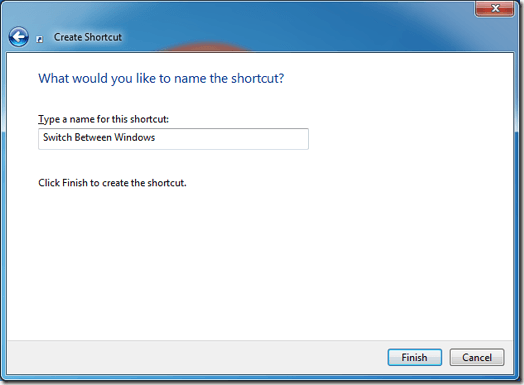
Click on the Next button and Windows will ask you to name your shortcut. Type in the name Switch Between Windows and click the Finish button. Truthfully, you could name this shortcut anything you want but it makes sense to use the name above so you can identify it easily later.
You should now have the Switch Between Windows shortcut on your desktop. However, you can give it the appropriate icon so it is easier to identify.
Right click on the Switch Between Windows shortcut and choose Properties.
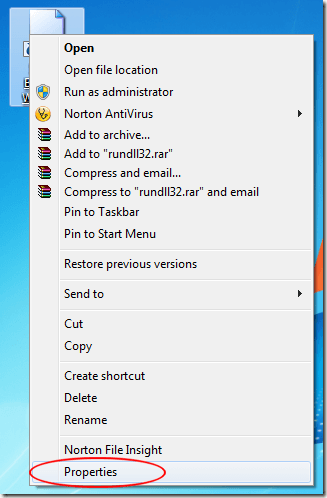
On the Shortcut tab, click the Change Icon button.
Click the Browse button and locate the file at:
C:\Windows\System32\imageres.dllBe careful because there are several files in that folder with similar names. Again, if your copy of Windows is installed on a driver other than C, change the driver letter to wherever you have Windows installed. Choose the icon in the upper left hand corner that looks like a bunch of stacked windows.
Click the OK button and then click the OK Button on the window underneath. The icon of your Switch Between Windows shortcut should change to the one you chose.
Using the Switch Between Windows Shortcut
Now that you have the new shortcut, click on it and notice that you don’t have to hold down any keys to make it work. Use the arrow keys on your keyboard to flip between open windows and use the Enter key to choose the window you want.However, storing the Switch Between Windows key on the desktop would mean that you need to minimize all windows currently open to get to it. To make your new shortcut more convenient to use, drag the shortcut to the taskbar to pin it. Now your Switch Between Windows shortcut will always be visible and ready to use.

Using the Windows key plus Tab combination is an awkward method of switching between windows using the Aero desktop. By creating a shortcut and pinning it to the taskbar, you always have the ability to use this feature in a much easier way.


No comments:
Post a Comment