


Windows Live Movie Maker makes it easy to edit the sound track in your movie projects. While its tools aren’t very advanced, and you can only have one sound track at a time, Windows Live Movie Maker does allow you some control over the sound in your videos.
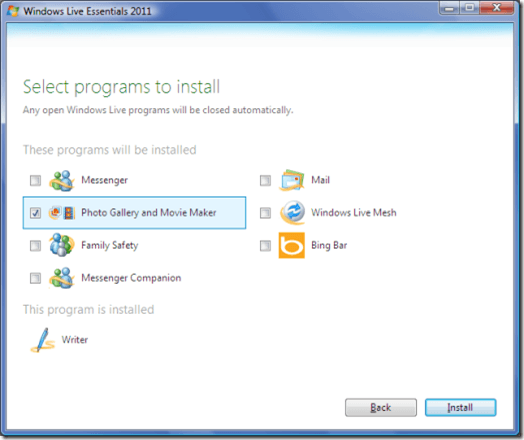
You can use these sound editing tools to add pre-recorded music, sound effects and narration to your videos. If you haven’t already, you can install Windows Live Movie Maker by installing Windows Live Essentials. After you start the installer, just click Choose the programs you want to install. Then click Photo Gallery and Movie Maker and click Install.
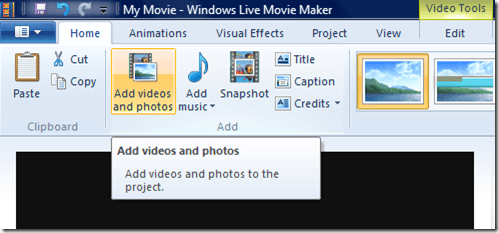
To get started, start Windows Live Movie Maker and select the Home tab. Then click Add videos and photo files to add your video or image files to your movie project. Then click the Add music button. The sound file types you can use with Windows Live Movie Maker include WMA, MP3, WAV, AIF, AIFF, M4A and OGG. When you’ve found and selected the sound file you want to use, click Open.
The sound file will automatically be added to your movie project. Click the Music Tools tab. Select the sound track in your video project. Select the Music volume button. Move the slider to the left to lower the volume. Move it to the right to raise the volume.
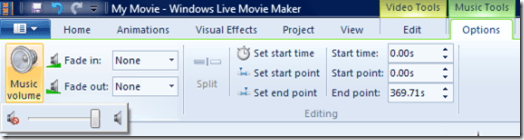
Select the drop-down menu beside Fade in. This option will cause the beginning of your sound track to slowly increase in volume as it starts. Choose Slow, Medium or Fast, depending on how quickly you want the track to fade in. Select Fade out to apply a similar fading effect to the end of your audio track.
Keep in mind that this option fades the sound in or out at the beginning or end of a sound clip, not at the beginning or end of your video. If you have multiple sound clips in your movie project, make sure you select the right ones when adding a fade effect.

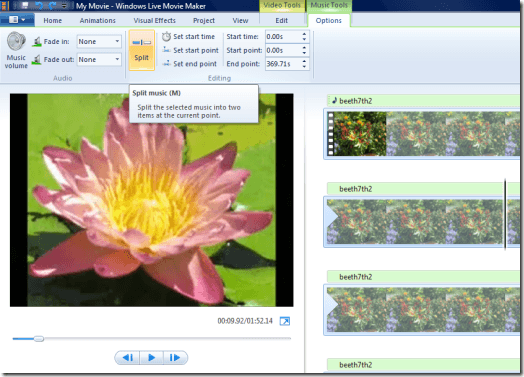
If you want to divide a single sound clip into several sound clips, select the point in your video where you want to cut the sound track. Then click the Split button. This will split only the sound track into multiple clips, leaving your video intact. Once you’ve split your sound clips, you can click and drag them around your video or right click to Cut, Copy and Paste them to another location.
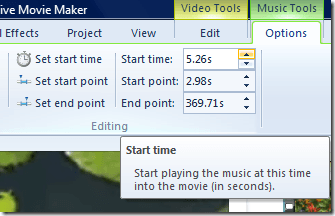
The Start time, Start point and End point will usually be set automatically. However, you can edit these values manually if you need to. Select a value and press the up and down arrow buttons to trim or extend the sound track.
If there is a conflicting sound track on your video file, click the Video Tools tab. Select the video track, then select Video volume. Slide the slider all the way to the left to completely mute the volume on the video track.
You can use these sound editing tools to add pre-recorded music, sound effects and narration to your videos. If you haven’t already, you can install Windows Live Movie Maker by installing Windows Live Essentials. After you start the installer, just click Choose the programs you want to install. Then click Photo Gallery and Movie Maker and click Install.
To get started, start Windows Live Movie Maker and select the Home tab. Then click Add videos and photo files to add your video or image files to your movie project. Then click the Add music button. The sound file types you can use with Windows Live Movie Maker include WMA, MP3, WAV, AIF, AIFF, M4A and OGG. When you’ve found and selected the sound file you want to use, click Open.
The sound file will automatically be added to your movie project. Click the Music Tools tab. Select the sound track in your video project. Select the Music volume button. Move the slider to the left to lower the volume. Move it to the right to raise the volume.
Select the drop-down menu beside Fade in. This option will cause the beginning of your sound track to slowly increase in volume as it starts. Choose Slow, Medium or Fast, depending on how quickly you want the track to fade in. Select Fade out to apply a similar fading effect to the end of your audio track.
Keep in mind that this option fades the sound in or out at the beginning or end of a sound clip, not at the beginning or end of your video. If you have multiple sound clips in your movie project, make sure you select the right ones when adding a fade effect.
If you want to divide a single sound clip into several sound clips, select the point in your video where you want to cut the sound track. Then click the Split button. This will split only the sound track into multiple clips, leaving your video intact. Once you’ve split your sound clips, you can click and drag them around your video or right click to Cut, Copy and Paste them to another location.
The Start time, Start point and End point will usually be set automatically. However, you can edit these values manually if you need to. Select a value and press the up and down arrow buttons to trim or extend the sound track.
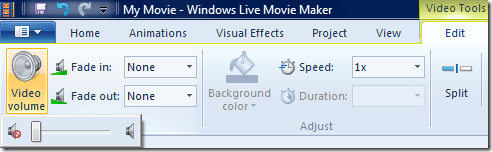
If there is a conflicting sound track on your video file, click the Video Tools tab. Select the video track, then select Video volume. Slide the slider all the way to the left to completely mute the volume on the video track.


No comments:
Post a Comment