Buying speakers and a good sound card is the first step to getting surround sound from your Windows 7 PC. However, even after you place your speakers and install the drivers, you still need to setup your surround sound system. Learn how to setup a surround sound system in Windows 7.
Note that even though you have surround speakers, there are times when you may want to revert back to stereo, mono, or some other sound configuration. Many people report hearing better sound using a stereo setup when the original source of the sound was recorded in stereo. The same is true with other configurations. Knowing how to setup surround sound in Windows 7 will allow you to quickly switch arrangements to get the best sound from your PC.

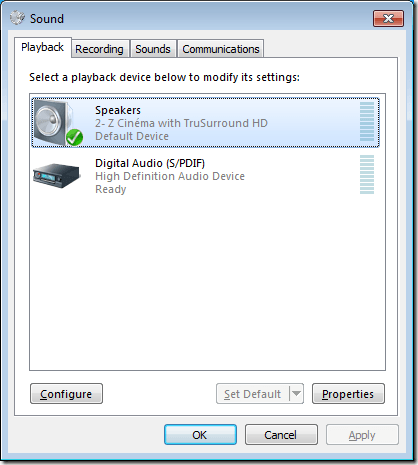
In the Sound window, locate your sound device, click on it once, and then click on the Configure button. Note that you may have several sound devices selected here. Make sure the sound device you are about to configure is set as the default sound device.

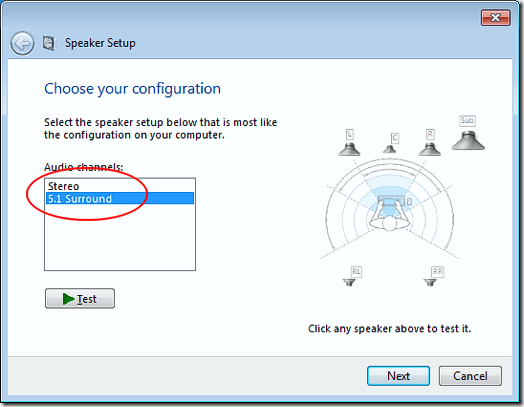
In the Speaker Setup window, note the types of configurations of which your speakers are capable. In our example, the sound device on our test computer is capable of Stereo and 5.1 Surround. Yours may be capable of more or fewer depending on your hardware.

Select the configuration you want in the Audio Channels box. Note that the picture to the right changes depending on your choice. For example, choosing Stereo removes all but two of the speakers pictured. 5.1 adds four additional speakers and 7.1 adds five additional speakers.
Make sure your speakers are turned on and the volume is turned up enough so you can hear them. Click the Test button and listen as Windows 7 tests each of the speakers in your setup. Note any speakers that are not producing sound and adjust the volume accordingly so you can comfortably hear sound coming from each of the speakers.
When finished, click the Next button. Here you can further customize your speakers by telling Windows 7 which speakers are present in your setup. Typically, you do not have to make any changes here unless you have a specific reason for muting or turning on or off certain speakers.
When done, click the Next button. On this window, much of the same logic applies as on the last one. Unless you have a specific reason for turning off these speakers, leave everything checked and click the Next button. The last screen lets you know that configuration is complete. Click the Finish button and you are done setting up surround sound in Windows 7.
Windows 7 allows you to customize your speakers when setting up surround sound. Using the built-in sound utility in Windows 7, you can test, turn on, turn off, and reconfigure your surround sound. If you later decide to make changes to how surround sound operates, run the utility again and make the changes you want to make.
Surround Sound and Windows 7
It takes some specific hardware and software to achieve surround sound from a Windows 7 PC. First, you must invest in either 5.1 or 7.1 speakers. With 5.1 surround sound, you get the following speaker configuration:- Left front
- Right front
- Center front
- Left rear
- Right rear
- Subwoofer
- Left front
- Right front
- Center front
- Left rear
- Right rear
- Side left
- Side right
- Subwoofer
Note that even though you have surround speakers, there are times when you may want to revert back to stereo, mono, or some other sound configuration. Many people report hearing better sound using a stereo setup when the original source of the sound was recorded in stereo. The same is true with other configurations. Knowing how to setup surround sound in Windows 7 will allow you to quickly switch arrangements to get the best sound from your PC.
How to Setup Surround Sound in Windows 7
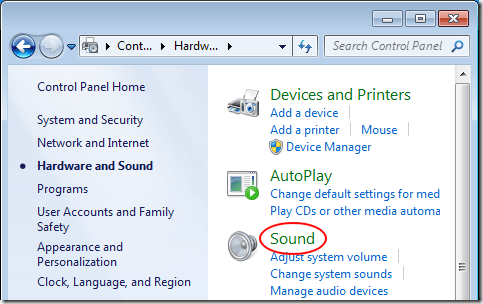
Begin by clicking on Start>Control Panel>Hardware and Sound>Sound.
In the Sound window, locate your sound device, click on it once, and then click on the Configure button. Note that you may have several sound devices selected here. Make sure the sound device you are about to configure is set as the default sound device.

In the Speaker Setup window, note the types of configurations of which your speakers are capable. In our example, the sound device on our test computer is capable of Stereo and 5.1 Surround. Yours may be capable of more or fewer depending on your hardware.

Select the configuration you want in the Audio Channels box. Note that the picture to the right changes depending on your choice. For example, choosing Stereo removes all but two of the speakers pictured. 5.1 adds four additional speakers and 7.1 adds five additional speakers.
Make sure your speakers are turned on and the volume is turned up enough so you can hear them. Click the Test button and listen as Windows 7 tests each of the speakers in your setup. Note any speakers that are not producing sound and adjust the volume accordingly so you can comfortably hear sound coming from each of the speakers.
When finished, click the Next button. Here you can further customize your speakers by telling Windows 7 which speakers are present in your setup. Typically, you do not have to make any changes here unless you have a specific reason for muting or turning on or off certain speakers.
When done, click the Next button. On this window, much of the same logic applies as on the last one. Unless you have a specific reason for turning off these speakers, leave everything checked and click the Next button. The last screen lets you know that configuration is complete. Click the Finish button and you are done setting up surround sound in Windows 7.
Windows 7 allows you to customize your speakers when setting up surround sound. Using the built-in sound utility in Windows 7, you can test, turn on, turn off, and reconfigure your surround sound. If you later decide to make changes to how surround sound operates, run the utility again and make the changes you want to make.


No comments:
Post a Comment