Sharing folders has become a common practice in local and corporate networks. Over the Internet, we can share our latest downloads of pictures of our favorite celebrities, MP3 collections, ripped movies (legal of course) and virtually any other file we want to share.
On a shared PC, folders outside a user’s documents and settings folder are accessible by anyone who can login to that PC. However there are cases that we would want to restrict access to folders. In this post I will show you how to set security permissions on a folder in Windows Vista.
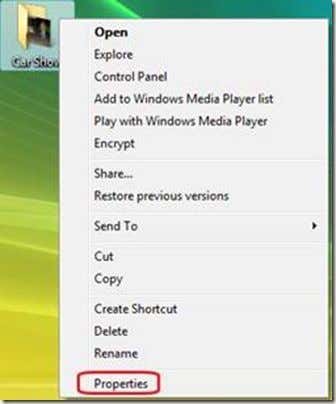
· Right click the folder you want to set the access permissions for and then select Properties.
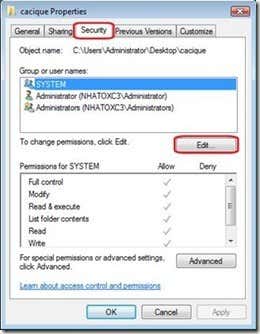
· In the properties window click on the Security tab then click on Edit.
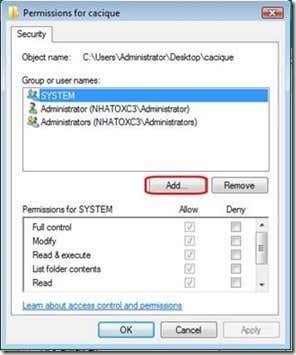
· On the Permissions window click on the Add button to open the Select Users Group or Groups window.
· On the Select Users or Groups window you can enter the usernames of the accounts you want apply the restrictions.
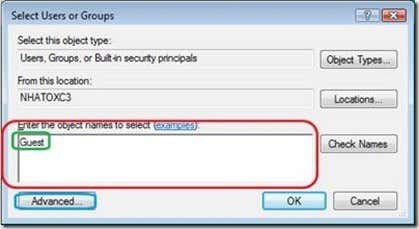
· If you are not sure of the usernames click on the Advanced button to open a search window. In the search window click on the Find Now button to display all the available usernames. Click on the user then click OK.
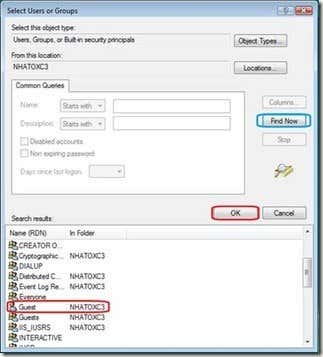
· On the Permissions window you can now set the permissions to deny/allow by checking the checkbox under the deny/allow option.
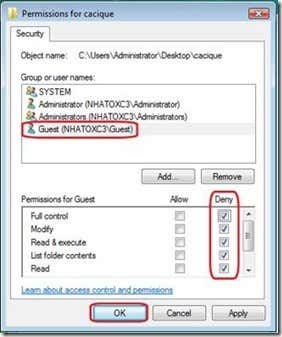
· On the security window that will pop up click OK.
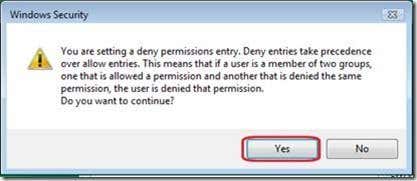
· The access permissions for the folder will now be applied. As you can see deny entries take precedence over allow entries. Be sure to remember this rule as it causes confusion for a lot of new users.
In the example above, I set all permissions for the guest user to deny. This means a guest account will not be able to modify or even read the contents of the folder. If guest log’s in to the PC or connects to the folder using LAN, the guest account will not be allowed to see the contents of the folder.
This is useful if you have multiple accounts setup on your computer, i.e. for kids or other family members, but want to prevent others for accessing a folder.
On a shared PC, folders outside a user’s documents and settings folder are accessible by anyone who can login to that PC. However there are cases that we would want to restrict access to folders. In this post I will show you how to set security permissions on a folder in Windows Vista.
· Right click the folder you want to set the access permissions for and then select Properties.

· In the properties window click on the Security tab then click on Edit.

· On the Permissions window click on the Add button to open the Select Users Group or Groups window.

· On the Select Users or Groups window you can enter the usernames of the accounts you want apply the restrictions.

· If you are not sure of the usernames click on the Advanced button to open a search window. In the search window click on the Find Now button to display all the available usernames. Click on the user then click OK.

· On the Permissions window you can now set the permissions to deny/allow by checking the checkbox under the deny/allow option.

· On the security window that will pop up click OK.

· The access permissions for the folder will now be applied. As you can see deny entries take precedence over allow entries. Be sure to remember this rule as it causes confusion for a lot of new users.
In the example above, I set all permissions for the guest user to deny. This means a guest account will not be able to modify or even read the contents of the folder. If guest log’s in to the PC or connects to the folder using LAN, the guest account will not be allowed to see the contents of the folder.
This is useful if you have multiple accounts setup on your computer, i.e. for kids or other family members, but want to prevent others for accessing a folder.


No comments:
Post a Comment